


For many businesses, accurately calculating work in progress (WIP) is essential for efficient operations and informed decision-making. But for those new to Microsoft Dynamics 365 Business Central, the process can seem daunting. Our blog post will guide you through the steps of calculating WIP in Business Central, leaving you feeling empowered and in control.
What is WIP in Business Central and Why Does it Matter?
In simple terms, WIP represents the value of partially completed goods or services at a given point in time. It’s like a snapshot of the resources you’ve invested in a job that’s not yet finished. Tracking WIP accurately helps you:
- Gain insights into project profitability: By understanding how much you’ve already spent on a job, you can make informed decisions about pricing, resource allocation, and whether to proceed further.
- Improve cash flow management: WIP ties up valuable cash, so understanding your WIP levels can help you forecast your cash flow more accurately and make better financial decisions.
- Boost operational efficiency: WIP tracking can help you identify bottlenecks and inefficiencies in your production process, allowing you to streamline operations and save costs.
Calculating WIP in Business Central: A Step-by-Step Guide
Now that you understand the importance of WIP, let’s delve into the practicalities of calculating it in Business Central. Here’s a simplified breakdown:
- Choose Your Method: Business Central offers two methods for calculating WIP: the direct costing method and the absorption costing method. The direct costing method considers only direct costs (materials and labour), while the absorption costing method also factors in indirect costs (overheads). Choose the method that best suits your business needs and accounting practices.
- Specify What to Include: Decide which costs you want to include in your WIP calculation. This typically includes direct materials, direct labour, and any other costs directly attributable to the job. You can also choose to include a portion of your indirect costs based on your chosen costing method.
- Post the WIP to the General Ledger: Once you’ve determined your WIP amount, you can post it to the general ledger. This creates a financial record of your WIP and allows you to track it over time.
Let’s look at these sections in more details…
To calculate WIP
- Choose the Lightbulb that opens the Tell Me feature. icon, enter Jobs, and then choose the related link.
- In the Jobs list, select the Deerfield job, and then choose the Edit action. This opens the job card in edit mode.
WIP can be calculated based on Cost Value, Sales Value, Cost of Sales, Percentage of Completion, or Completed Contract. In this example, CRONUS uses the Cost Value method.
- On the Posting FastTab, choose the WIP Method field, and then select Cost Value.
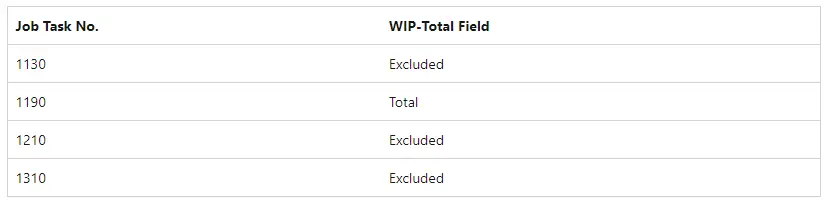
- Choose the Job Task Lines action and set the following values in the WIP-Total field. The following table describes the values:

- Choose the WIP action, and then choose the Calculate WIP action.
- On the Job Calculate WIP page, you can select a job that you want to calculate WIP. On the Job FastTab, select Deerfield in the No. field.
- In the Posting Date field, enter a date that is later than the work date.
- In the Document No. field, enter 1. This creates a document that you can refer to later for traceability.
- Choose the OK button to run the batch job. A message is displayed. Choose the OK button to continue. Close the Job Task Lines page.
- On the Job card, expand the WIP and Recognition FastTab to see the calculated values. You can also see the WIP Posting Date and the values that have been posted to the general ledger, if any.
Note: The message states that there are warnings associated with the WIP calculation. You will review the warnings in the next procedure.
To review WIP warnings
- Choose the Lightbulb that opens the Tell Me feature. icon, enter Job WIP Cockpit, and then choose the related link.
- Select the Deerfield job, and then choose the Show Warnings action.
- On the Job WIP Warnings page, review the warning associated with the job.
After the accounting period ends, Tricia has to recalculate the WIP to include completed work to this point.
To recalculate WIP
- On the Job card, choose the WIP Entries action to view the WIP calculation.
- You can follow the steps in the procedure that explains how to calculate WIP to recalculate WIP. Every time WIP is calculated, an entry is created on the Job WIP Entries page.
- Close the page.
The Job WIP Entries page shows the WIP entries that were last calculated on a job, even if WIP hasn’t yet been posted to the general ledger.
Note: Work in Progress and Recognition is only calculated. It is not posted to the general ledger. To do so, you must run Post WIP to G/L batch job after you have calculated the WIP and Recognition.
To post WIP to general ledger
- From the Jobs list, select the Deerfield job.
- Choose the WIP action, and then choose the Post WIP to G/L action.
- On the Job Post WIP to G/L page, on the Job FastTab, select Deerfield in the No. field.
- On the Options FastTab, in the Reversal Document No. field, enter 1.
- Choose the OK button to post WIP to the general ledger.
- Choose the OK button to close the confirmation page.
After you have completed the posting, you can view the posting information on the WIP G/L Entries page.
- In the Jobs list, select the Deerfield job, and then choose the WIP G/L Entries action.
- On the Job WIP G/L Entries page, verify that the WIP has been posted to the general ledger.
- Close the page.
- Open the Job card for the Deerfield job.
- On the WIP and Recognition FastTab, notice that in the Posted column, the Recog. Costs G/L Amount field is now filled in, which indicates that WIP was posted to the general ledger successfully.
- Choose the OK button to close the card.
Remember, WIP is Dynamic!
It’s important to remember that WIP is not a static figure. As your job progresses, you’ll need to recalculate your WIP to reflect the latest costs incurred. Business Central makes this easy with its built-in recalculation features.
Additional Tips
- Automate Whenever Possible: Business Central offers automation tools to streamline your WIP calculations, saving you time and effort.
- Reconcile Regularly: Regularly reconcile your WIP balances with your physical inventory to ensure accuracy.
- Seek Guidance: If you’re new to WIP calculations or have complex business needs, consult with a qualified accounting professional.
By following these steps and tips, you’ll be well on your way to mastering WIP calculations in Microsoft Dynamics 365 Business Central. Remember, accurate WIP tracking is a valuable tool for any business, empowering you to make informed decisions and drive profitability.