We support our customers every day when it comes to using Sage 50, and part of this is helping them to understand how they can do things faster and easier.
Our Senior Software Support Specialist, Louise, has pulled together some of her favourite Sage 50 hints and tips, so you can take advantage of some of the ways you can work smarter and faster, that you might not already know about.
Saving time using function keys.
- F1: Opens a support guide that covers the area of the software you are using
- F2: Opens the calculator
- F3: When creating invoices – Opens the edit Item Line windows. This displays the information relating to that item on the invoice when creating a customer or supplier receipt – it pays the receipt in full
- F4: If pressed in a box which refers to a module, a list appears for that module in a date box, a date picker appears in a value box, a calculator picker appears
- F5: If pressed in a value box, the currency calculator appears in a text box, the spell checker appears
- F6 Duplicate key. If pressed in a batch data entry window, information is copied from the field above. TIP: If you use shift and F6 in the batch data entry window, information is copied from the field above and incremented by one.
- F7: Use to insert a blank line when entering data.
- F8: Use to delete the whole line
- F9: Calculates net amount
- F11: By default, this opens the Windows Control Panel, You can change this to open other software. See below.
- F12: By default, this opens Sage Report Designer. You can change this for it to open other software. See below.
Change F11 and F12 keys.
You can configure these two function keys to activate the software of your choice.
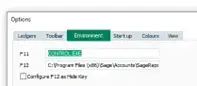
- Click Tools, then click Options.
- Click the Environment tab.
- Replace the path and program file with what you want to activate using F11 and F12.
- To configure F12 to minimise your Sage 50cloud Accounts software, select the Configure F12 as Hide Key check box.
- Click OK.
Show alternate row colours on record lists.
You can add alternate row colours to the lists in each module of Sage 50cloud Accounts.
This makes things easier to find when you’re working with large lists of records or transactions.
- On the menu bar click Tools click Options then click the Colours tab.
- Under Alternate row colour, ensure the Ignore custom colours check box is blank.
- For the relevant module click the colour picker.
- Click the colour you want to use, or to define your own colour via Define custom colours.
- To confirm the selected colour, click OK.
Configure your toolbars and columns.
To help you work more efficiently, you can configure the desktop to hide what you don’t need, making the options you do use easier to find.
You can also choose to display extra data columns that would normally be hidden to suit your needs. You can configure:
Modules on the navigation bar
- Right-click anywhere on the navigation bar down the left.
- From the list click the module you want to show or hide.
Toolbar options within each module
- Open the required ledger, for example Customers.
- Right-click the toolbar and choose the option you want to show or hide.
Data columns
- From the relevant window, right-click any column heading.
- Click the column you want to add or remove.
The lock date function.
- Go to Settings > Lock Date.
- Tick the box and enter your cut-off date for posting.
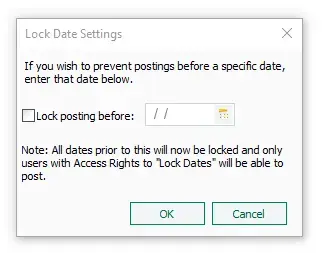
Once you set a lock date, if anyone attempts to post a transaction dated prior to that lock date, a warning message appears (please note this message doesn’t appear if you are importing transactions).
If you’re logged in as manager, you can override the warning and post to the locked period.
- Users with lock date access can also override the lock date and post to the locked period.
- Users with no lock date access can’t post to the locked period. They can still create invoices, sales orders and purchase orders with a date before the lock date, but they can’t update or post the items.
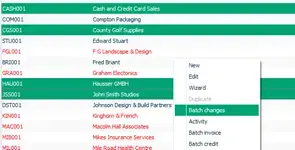
Make batch changes.
- Take a backup of your data.
- Open the relevant module, for example Customers, and select the records you want to amend.
- Right-click one of the selected records then click Batch changes.
- On the blank record, amend the required boxes. Boxes which you can’t change aren’t available. If none of the boxes on a tab can be amended, the tab doesn’t appear.
- Click Save then click Yes.
Flag a record as inactive.
you can use the Inactive flag in Sage 50 Accounts to hide old and unused customer, supplier, product, nominal or bank records from your record lists without deleting them.
- Open the required module, for example Customers, Products or Bank accounts, then double-click the required record.
- Select the Inactive check box in the Account Details section, click Save then click Close.
TIP: You can flag multiple records as inactive via the aforementioned batch changes process.
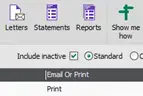
View or hide inactive records on your lists.
-
Open the required module, for example Customers, Products or Bank accounts.
- To see inactive accounts throughout the software, select the Include inactive check box.
- To hide inactive accounts in the relevant module and in record lists when posting transactions, invoices, and orders, clear the check box.
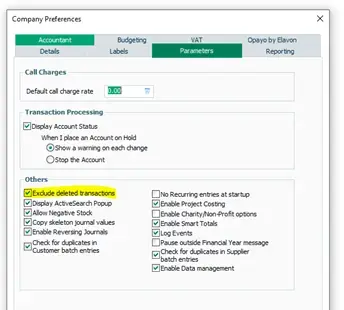
- Click Settings and click Company Preferences then click Parameters.
- Select the Exclude deleted transactions check box then click OK.
Do one of the following:
Hide deleted transactions.
A great way to speed up your processing is to hide deleted transactions from your lists, activity windows and reports.