Advanced Business Cloud Essentials – Beginners’ Guide
Chapter 2: Stock Control
Chapter 2: Stock Control
Stock & Order Screen
The stock & order items screen allows users to create, view, edit and report against stock records. Any item that is bought, sold, manufactured, used in production, or used by the business should be created as a stock record. Stock records in Business Cloud include both physical and non-physical items such as Services and Consumables.
From the main stock & order item screen users will see an overview of stock items, Qty’s, free stock Qty, forecast Qty, Item type and list price.
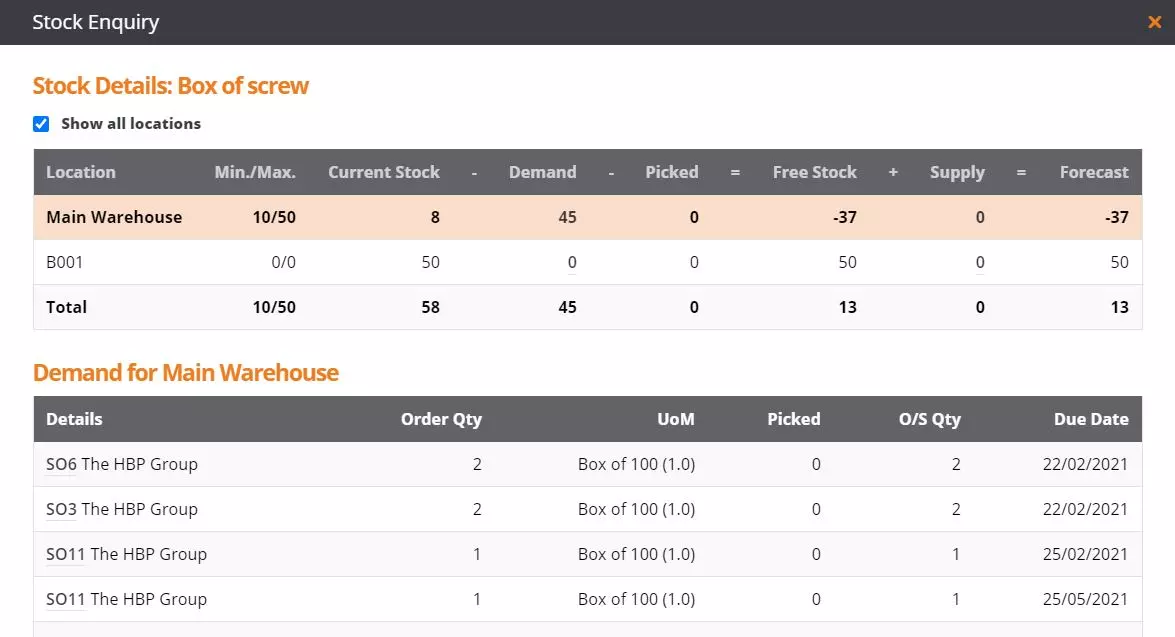
Stock Qty: The Qty of stock physically across all locations
Free Stock Qty: Physical stock minus demand for the item including sales and production across all locations
Forecast Stock Qty: Free stock Qty plus any expected Qty’s that are due in from purchases or production.
A breakdown of stock Qty’s per location can be seen by selecting the Qty number in the table from the stock & items screen. This will load the stock enquiry screen showing Qty’s for each active stock location. Users can click the Qty within the demand and supply columns to get a further breakdown of where that Qty is being populated from.
Stock Records
Navigate to Stock & Order Items > + New
When creating stock items in Business Cloud, users must first select the item type to be created. It is important that the correct item type is selected as each one offers different functionality within the system.
Stock Items: Items that are sold or purchased where you wish to track stock levels and costs.
Service Items: Services charged to yourself or customers. Example: Delivery.
Consumable Items: Non-stock purchase order items that you want to track the cost of. Example: Hotel Cost.
Kit Items: Display on a sales order/invoice as one item but are a collection of items. Example: Console Bundles.
Asset Items: Item code used ONLY to record an asset purchase, no actual asset information or QTYs would be recorded against it.
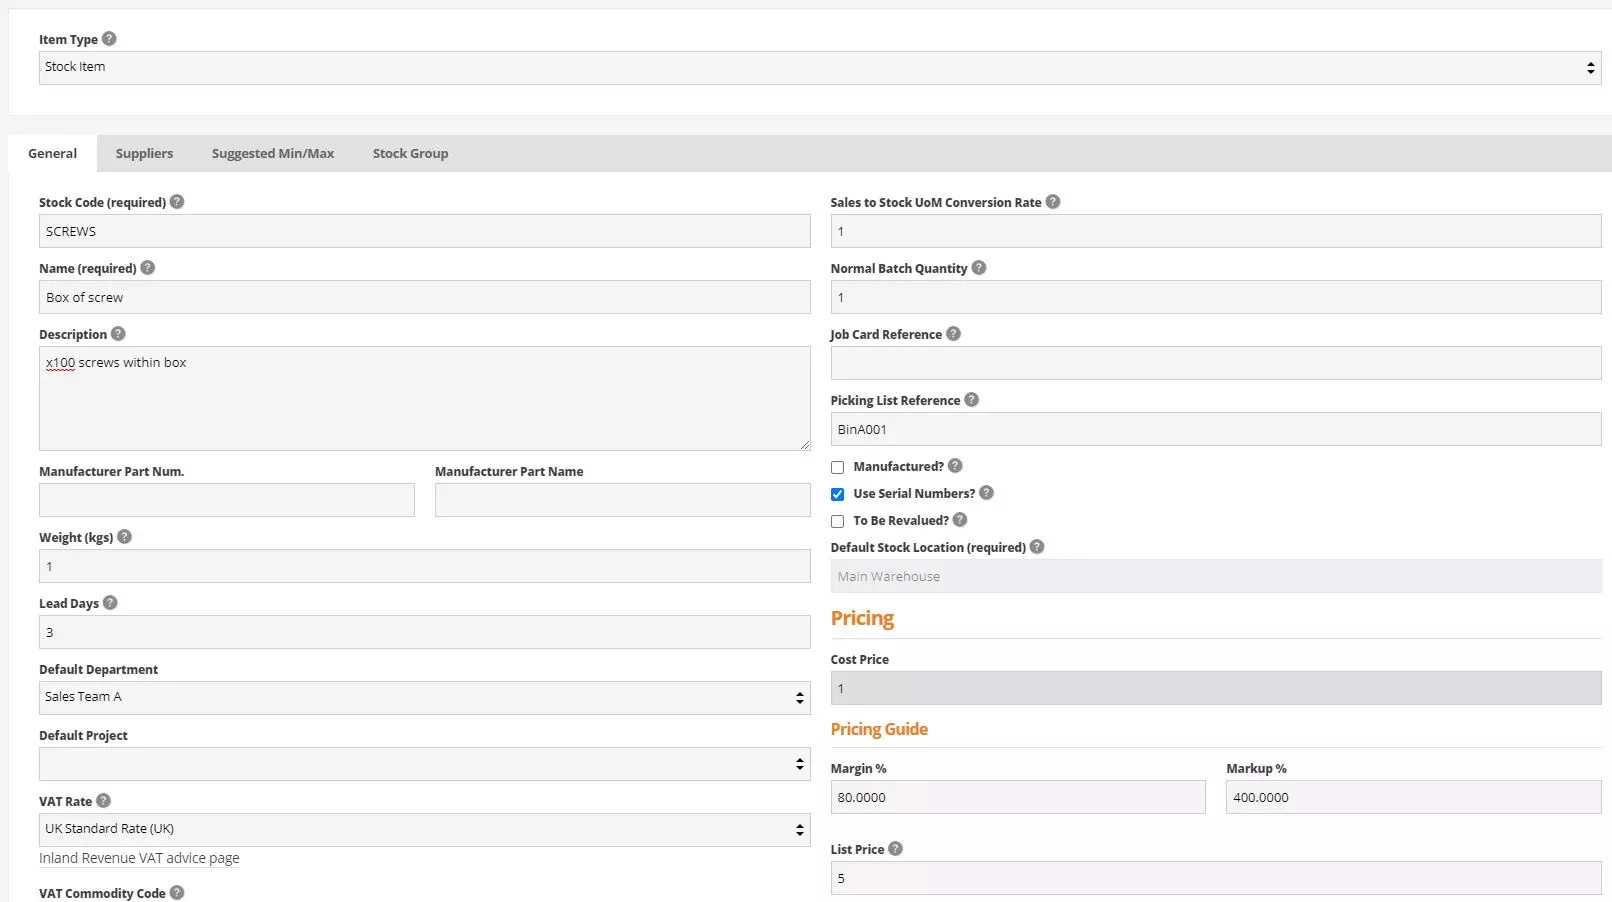
The example below goes through creating a standard stock item. Settings may differ for different item types. Some fields are required as standard by the system, others are not, however the more data populated the more users will get out of the system later when it comes to recording transactions and reporting. The stock record is split across 4 tabs to group settings together making set up and edits much easier. Tabs include General, Suppliers, Suggested min/max and Stock group. Data fields are self-explanatory.
Within the general section users are recording all the basic static information about the item such as the code, name, list price, VAT rate, unit of measure, references etc.
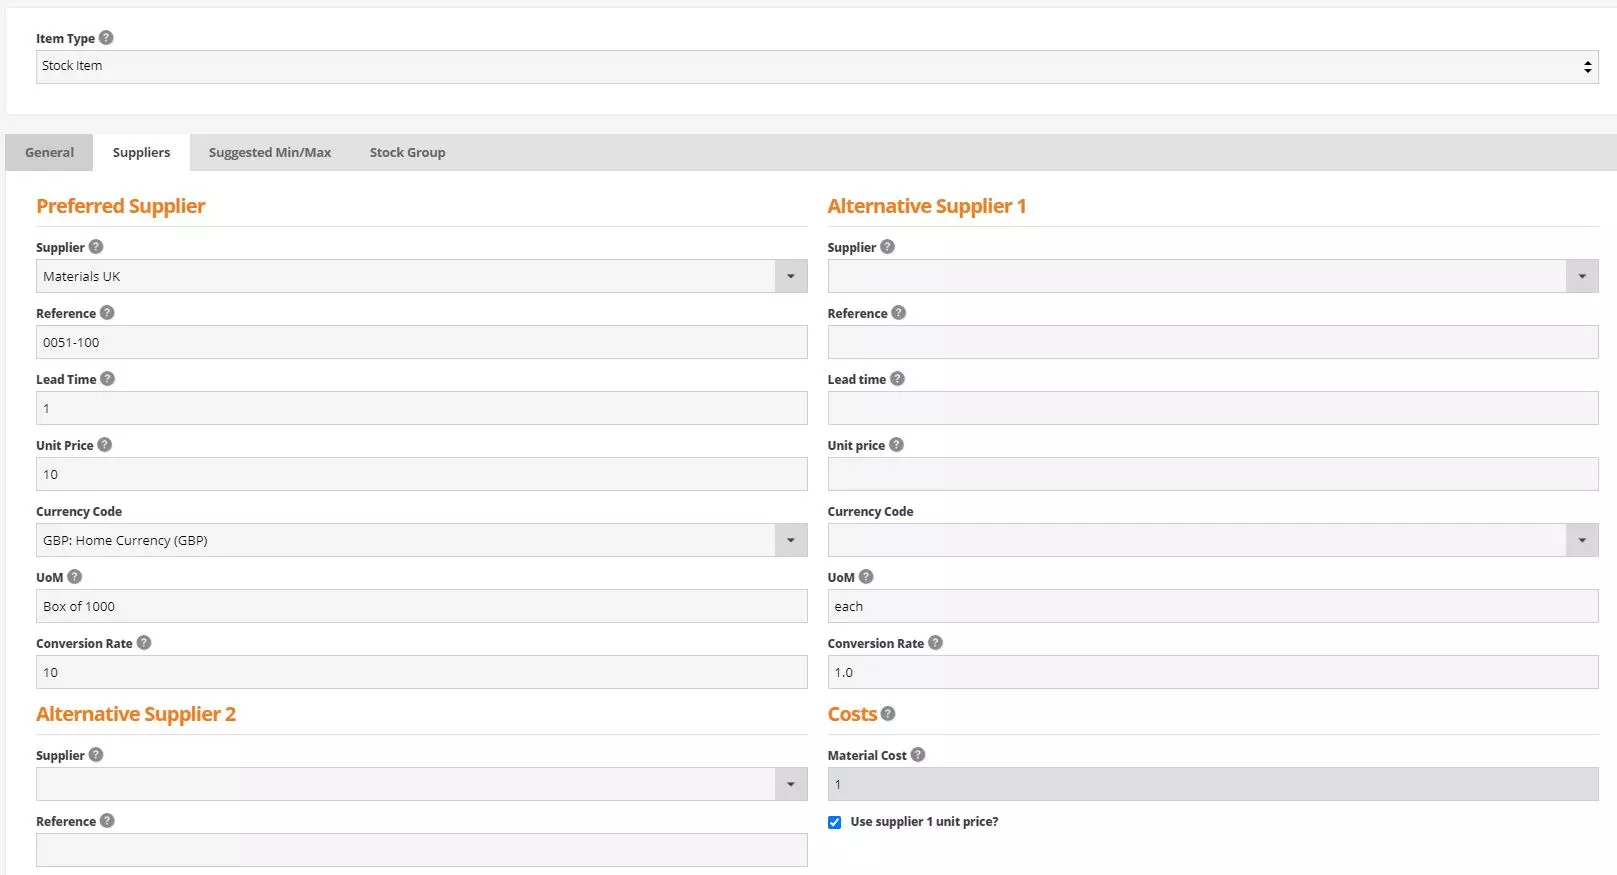
The suppliers tab allows users to record up to 3 different supplier defaults for purchasing items – including supplier codes, purchasing UOM & costs.
As well as the suppliers cost users can record the standard material cost. This is a free text field that can be populated manually or there is an option to populate it using the preferred supplier’s cost.
The system uses the material cost value for stock valuation reporting and for some standard accounting transactions when goods are booked in and invoiced (see purchasing, goods in and accounts for more information on this)
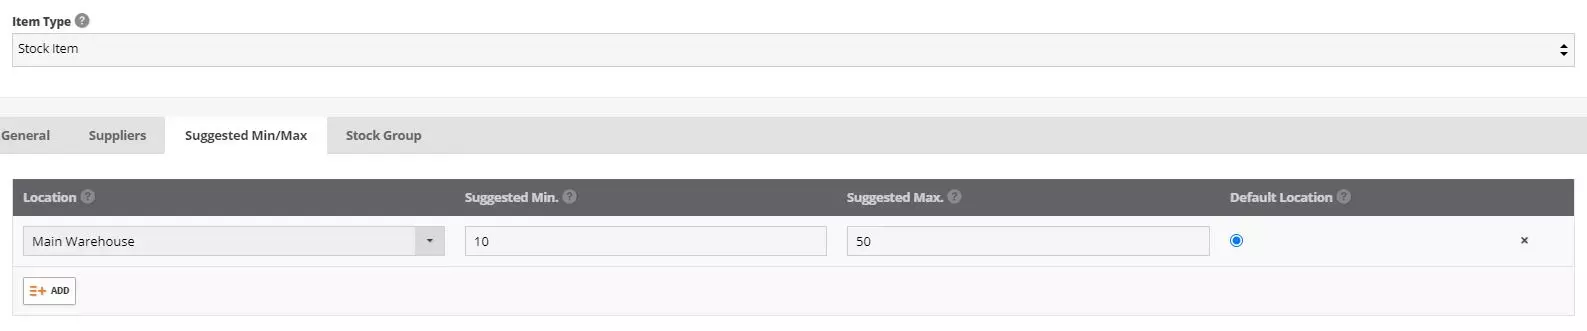
The suggested min/max tab allows users to record default and additional locations for where stock can be booked in and out. A min and max Qty can be recorded which will influence the materials requirement planning reports if stock falls below the MAX Qty. Having stock items set up correctly allow businesses to make better decision around purchasing stock and planning productions.
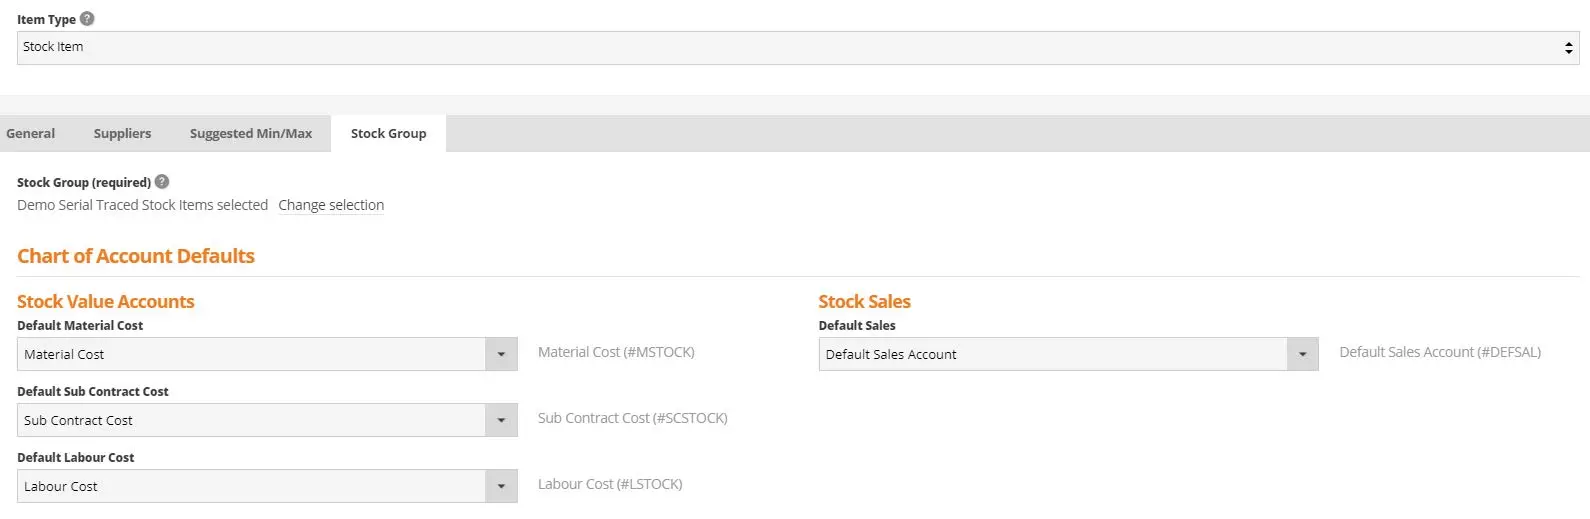
Stock groups are created within the admin module and allow default account nominals to be set up for transactions to post to within the accounts such as material cost, labour cost, sales, production etc. When a stock group is linked to a stock item, the default account nominals will be used for all transactions, if this is left as the default stock group then the default account nominals will be used for stock transactions. For more information please see stock groups and accounting.
Ensure that stock locations have been created before you create stock records. Locations can be physical locations, van, production areas, bins etc. Talk to your Project Manager or contact support for advice on what will work best with your business processes.
Once a stock record has been created it cannot be deleted. If you no longer use the stock record for sales or purchasing, you can mark the item as obsolete which will remove from your screen view, however will still be accessible in the back end of the system for historical view and reporting.
Reduce end of month journaling by creating stock groups and setting default sales & expense accounts
Let business cloud calculate the conversions of stock Qty’s sold and Qty’s booked out of stock by using up different UOMs and recording the conversion rate. This will allow the system to correctly adjust stock Qty’s being ordered and booked into stock automatically. For example, you may buy and stock eggs as single items however sell in boxes of 6. The sales UOM would be ‘Boxes of 6’ and the conversation rate would be 6 to ensure for every X1 sold and despatched, x6 are booked out.
Set lead days to give an expected due date on both sales and purchase orders and report on due dates being met or missed.
Attach job card and picking references with text you always want to display on works orders and picking lists.
Stock records can be imported via CSV. Templates can be downloaded from the system under Stock and Order Items > More.
Stock Traceability
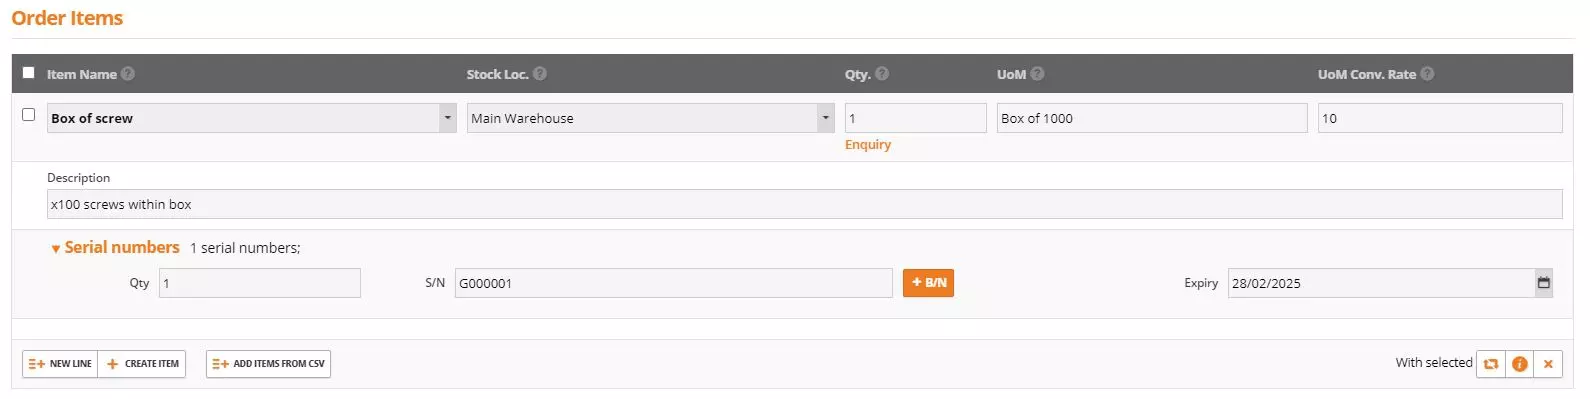
Stock items in business cloud can have Qty’s and cost traced throughout the system as standard – however if items have the ‘use serial numbers’ option enabled under the general tab then serial or batch numbers can be traced when goods are booked in and out of the system. Reports can also be run to see where serial or batch numbers are being used and have been used.
When goods are booked in or out an additional line will display under the item line for users to populate the serial or batch information. The Qty will be prepopulated against the item line as will also default as the serial or batch Qty however this can be amended by overriding the Qty field against the serial number or batch number.
Manufactured Stock Items
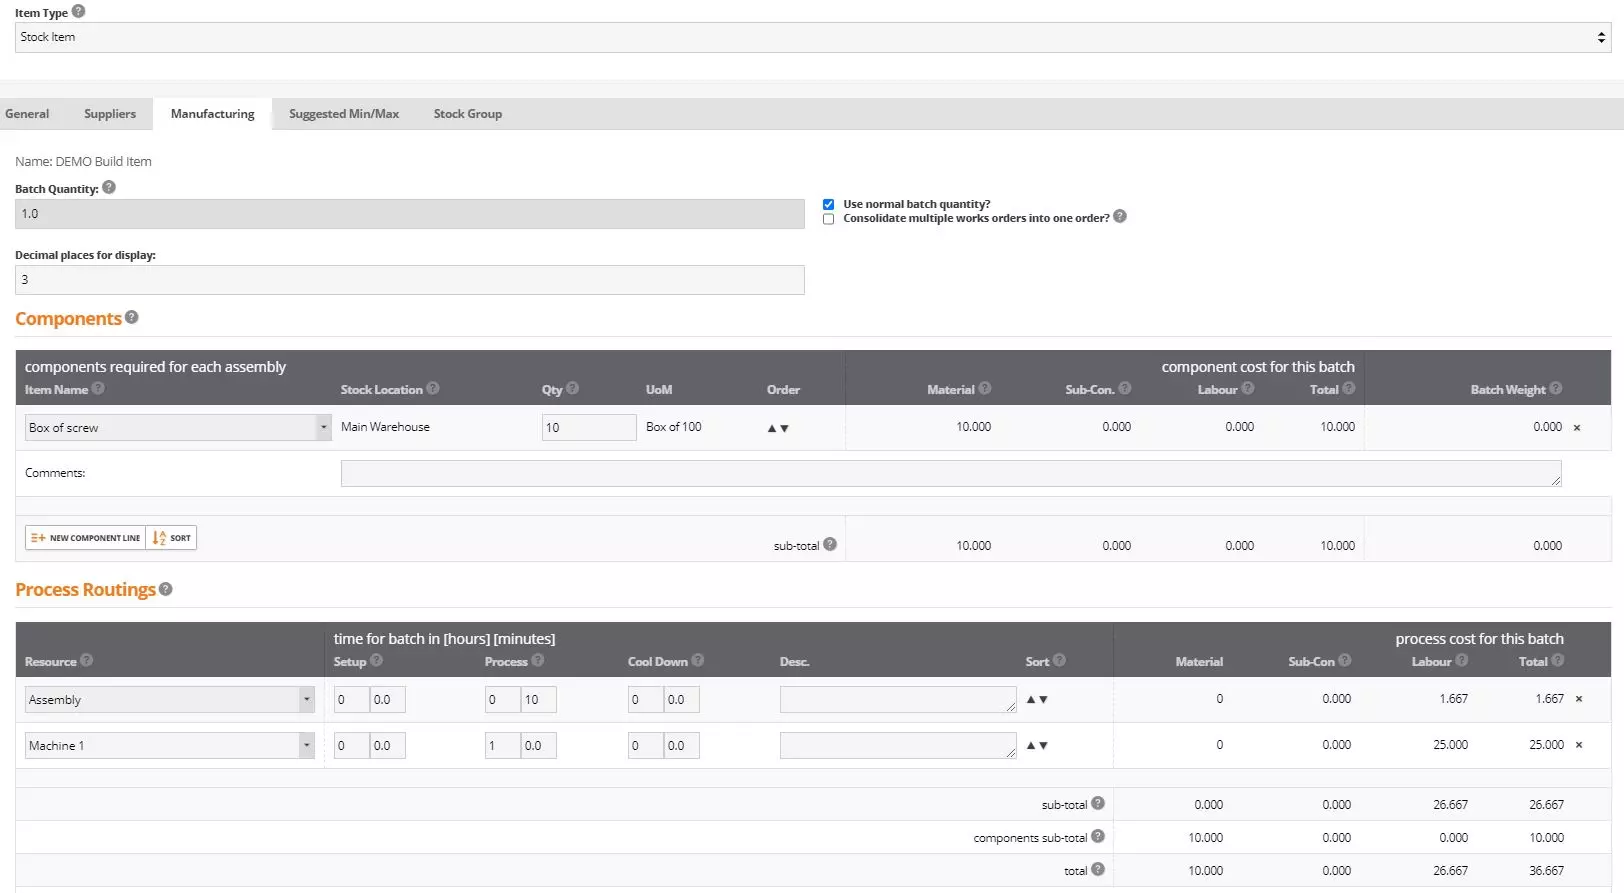
If an item is being manufactured and requires a works order, the ‘manufactured?’ option MUST be enabled against the stock item record. For items with the ‘Manufactured?’ option enabled an additional tab will display within the item record called manufacturing. Within the manufacturing tab users can record the bill of materials. A bill of material includes the standard batch Qty, components and processes routings for the build.
The components and Qty recorded relate to each single UOM built. The processes routings and timing relate to the batch qty recorded at the top of the manufactured tab. When a works order is created for the item for a higher or lower qty the system will automatically calculate the new component Qty’s and process timings.
Additional components, Qty’s, process routings and time can be recorded against the works order ad hoc, as well as removing them. If changes are made on a works order it will be traceable through the works order ID however will not update the bill of materials unless the stock record is amended.
Batch Qty relates to the standard Qty you make. This is useful to set if you have a minimum build Qty. The batch Qty is also used for the process routings timing. Time recorded is for the total batch and if an order is created for a different Qty then the system will automatically adjust the time.
Consolidate multiple works order into one order means when there is multiple different demand for the item, the materials requirement planning report will suggest creating just one works order instead of individual works orders for each demand.
To record the process routing, under the manufacturing tab or even on a works order ad hoc the resources MUST be set up in the system. See chapter 6 for more information
Stock Adjustments
Navigate to stock & order items > Actions > stock adjustments
Stock adjustment will automatically post transactions in the account’s module using the items material cost value, this usually posts to the stock adjustments account nominal however may be different if the business is using stock groups.
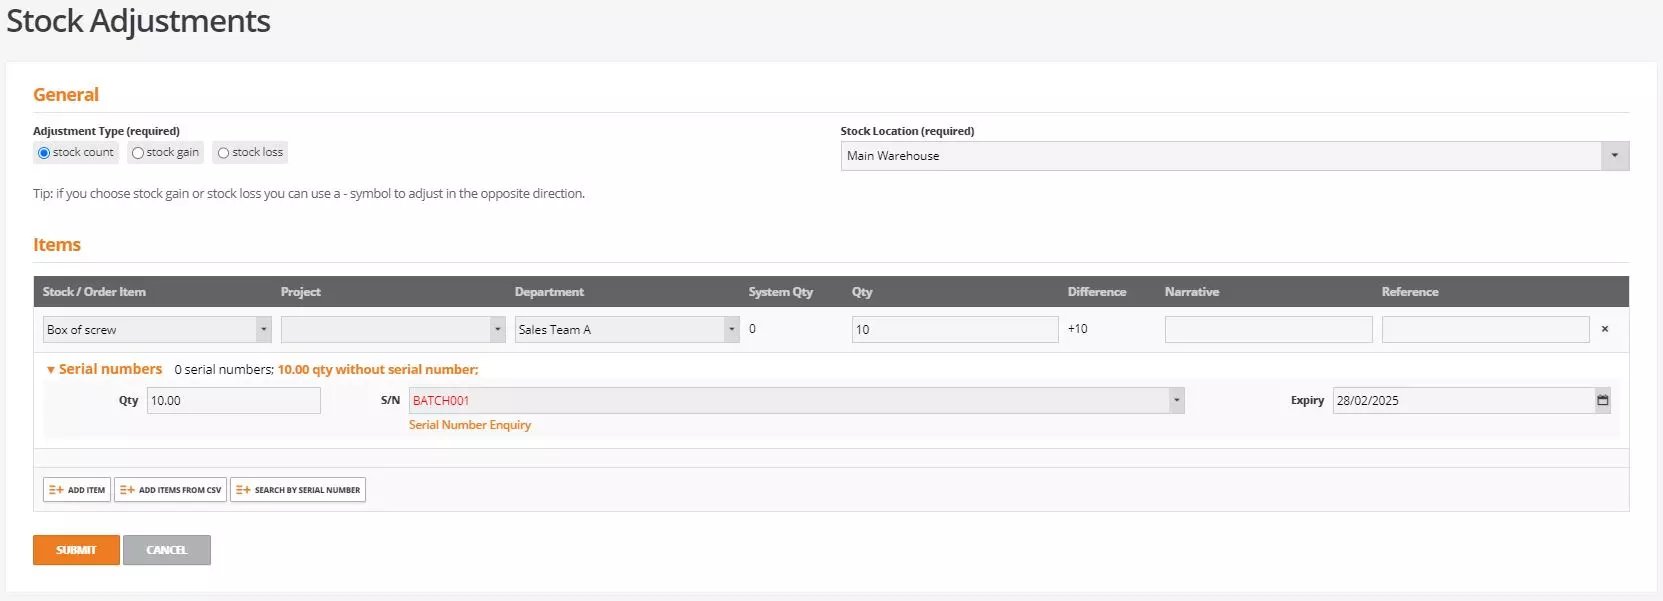
When selecting stock adjustment users must first select what type of adjustment, they are doing, followed by the stock location. The below example goes through a stock count, otherwise known as a stock take. Recording a stock gain or loss work the same, however the Qty field is used to record the Qty being added / removed.
Once the adjustment type and location has been selected, add items to the stock adjustment selecting ‘Add Items’ and searching for them by stock code or stock name. Once an item has been selected the system Qty will be populated. In the Qty column the counted Qty would be recorded and in the difference column the system will advise if any adjustments in or out will be made.
If an item has been added that requires a serial number, then the item Qty should be recorded against the top line and then the serial or batch number and Qty’s recorded under.
As well as adding items to the adjustment screen searching by stock code or name, there is a ‘search by serial number’ option which when selected will allow users to search for a particular serial number. This will then detail the serial number results. Select the item to add it to the adjustments table.
Once you are happy with the details shown on the adjustment screen, select submit. Any adjustments will be made, and account transactions will be posted.
From the stock & order items screen you can select the check box next to an item record or number of records then select actions > stock adjustments. This will prepopulate the selected items within the table.
Stock items can be added to the stock adjustments screen from a CSV. Download the CSV template, populate the data according and import to confirm and submit.
Stock Movements
Navigate to stock & items > Stock Movements
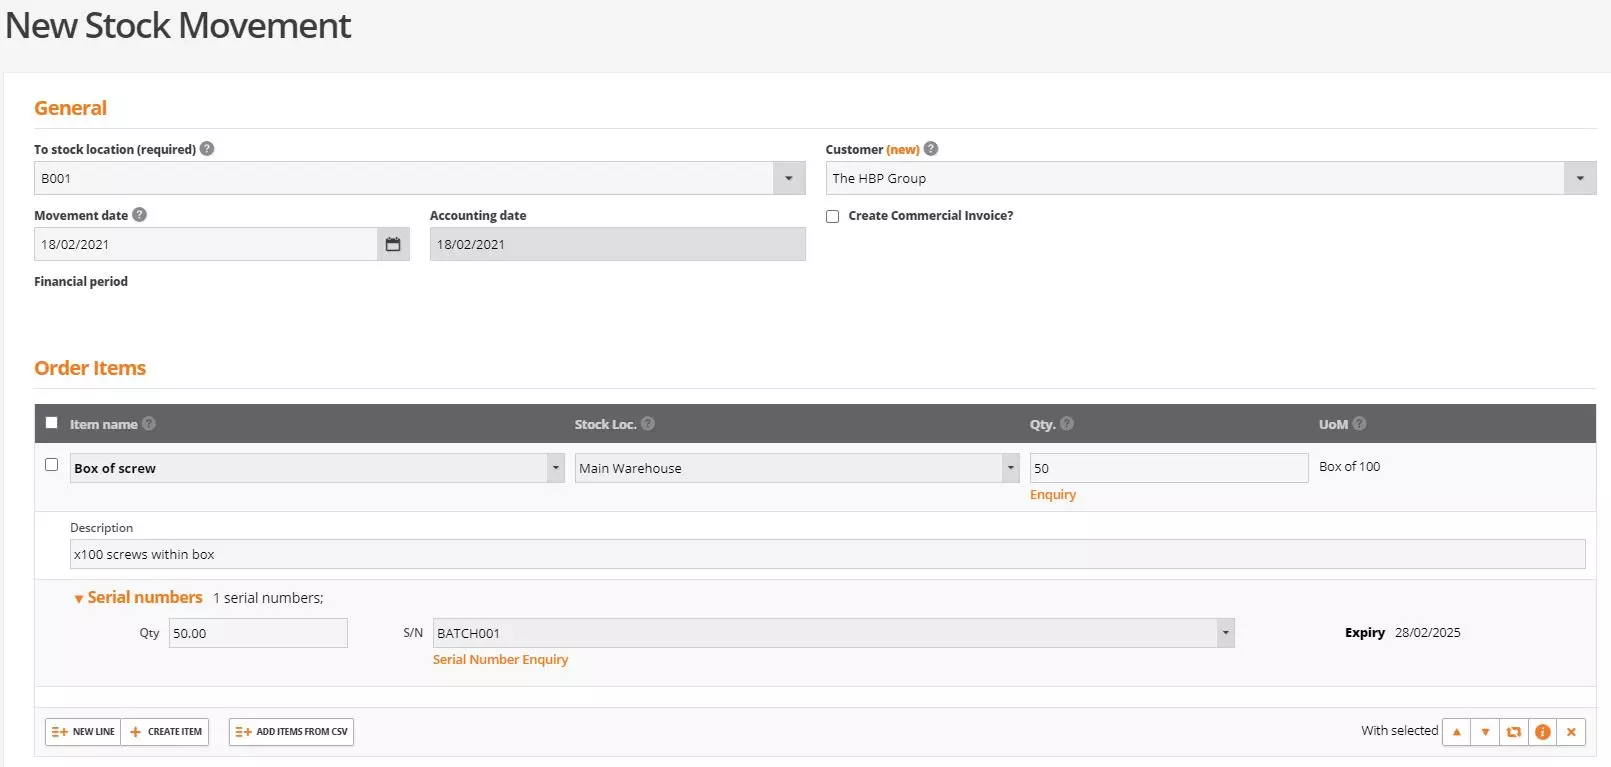
Stock movements in Business Cloud allow users to move stock Qty’s from one stock location to another and allow for a movement documentation to be printed for record purposes.
Users will need to tell the system where the stock is being moved TO by selecting a stock location from the available drop down. The movement date will default to today. If required, users can link the movement of stock to a customers’ account. This will not despatch the goods from the system, it is purely for reference and will show on documentation.
Add items to the stock movement searching by stock code or name, select the location stock it is being moved FROM and record the Qty being moved.
If serial traced items are being moved the serial numbers and Qty’s MUST also be recorded
Once saved the stock movements will be made.
Discount Rules
Navigate to Stock & Items > Discount Rules
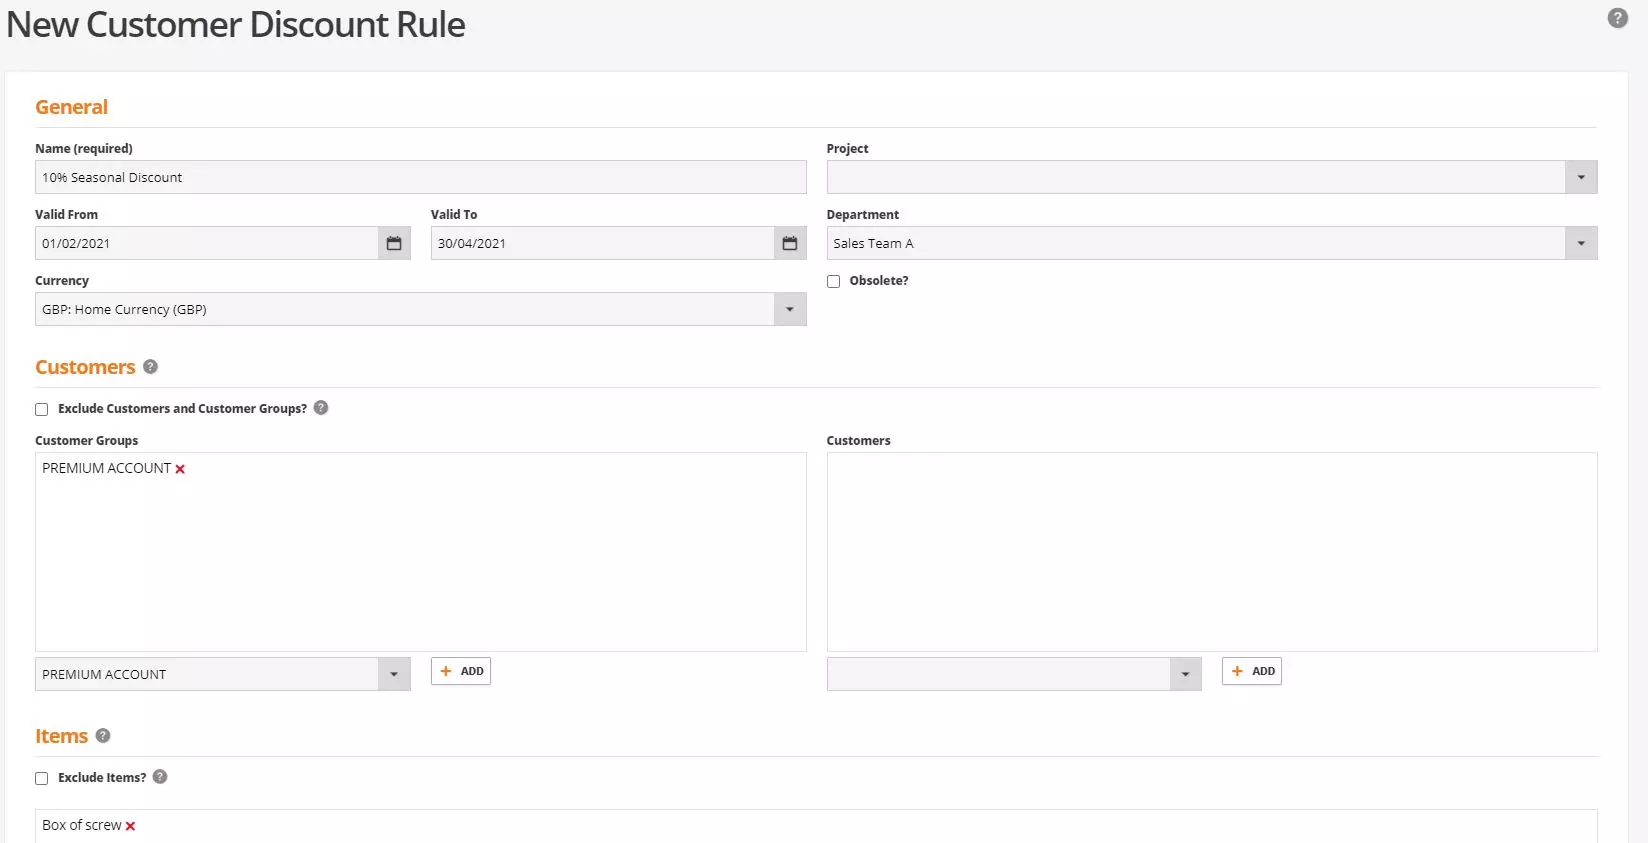
Discount rules can be created in Business Cloud to offer a discount against products that meet a set of criteria. To use discounts in business cloud, the system setting ‘use discount’ MUST be enabled.
Discount rules can apply to both customers and suppliers. The setup is the same for both, assign the discount a name, valid period, and currency. Select the active accounts for who the discount will apply to along with a list of items the discount will apply to. The ‘exclude’ options will mean any records assigned WILL NOT be eligible for the discount.
Within the discount rule, configure the value and rules to which the discount can be applied. The discount field details the value to be applied. Discount type can be a % of value and links with the discount field. The priority number can be set to indicate the position the discount will show if other discounts show for the same items / customer etc. The criterion would usually be set to ‘None’ unless the discount rule has different values for different Quantity or Value otherwise known as quantity breaks.
Total order discount can be applied by adding a service item to your quote or sales order and detailing the value as a minus figure in the list price.
‘Apply to all matching items on order’ If enabled and there is one eligible item on order then the same discount can be applied across all items regardless of being included in the discount rule set up.
To apply a discount to a quote, order, or invoice, select the ‘calc discount’ option at the bottom of the order items section on screen.
Pricelists
Navigate to stock & Items > Pricelists
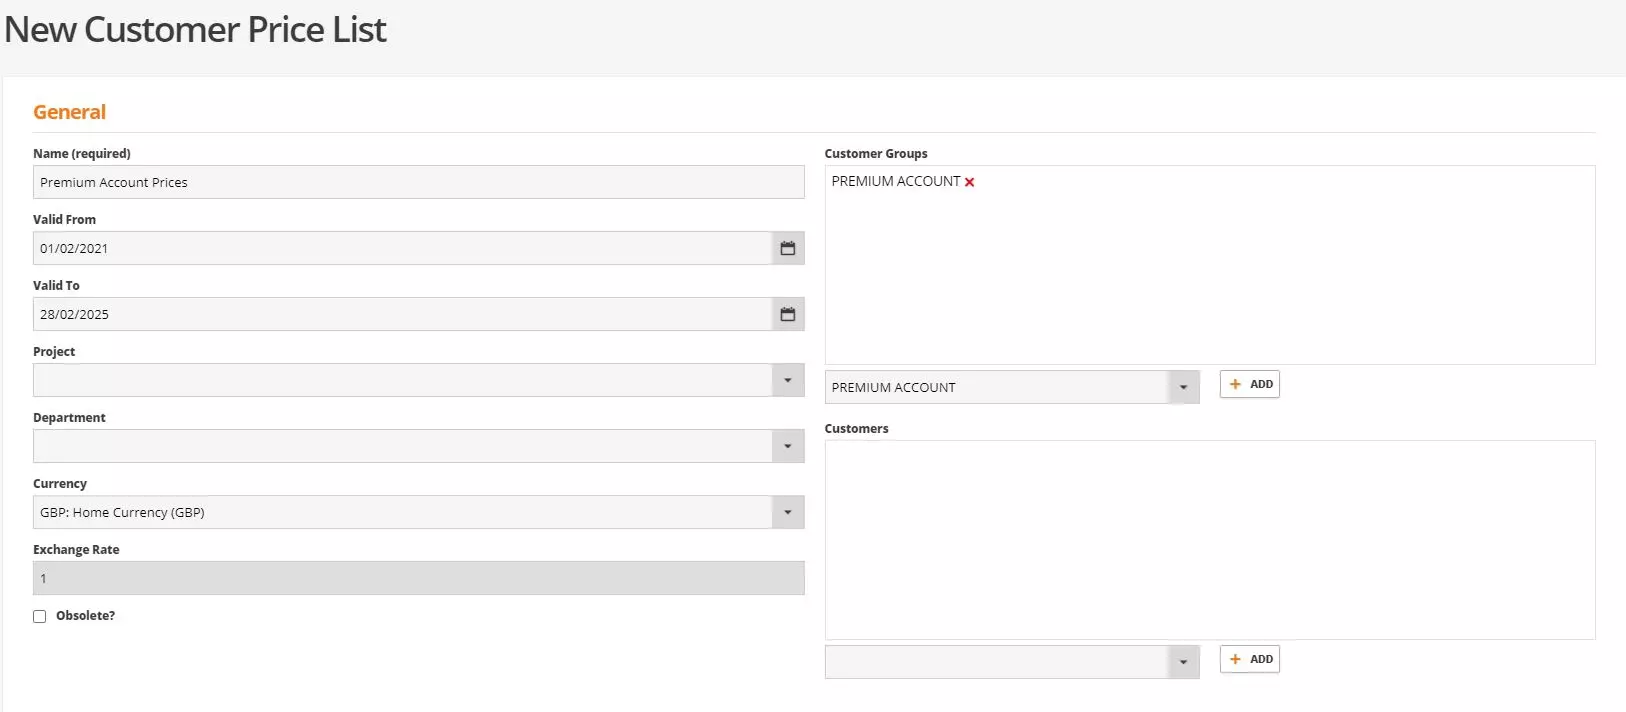
Pricelists can be created in business cloud for both customers and suppliers and allow a set list of products to be sold or purchased at a different price to what is recorded against the stock record.
When creating pricelists, assign it a name, valid period, and currency. Select the active accounts for who the pricelist will apply
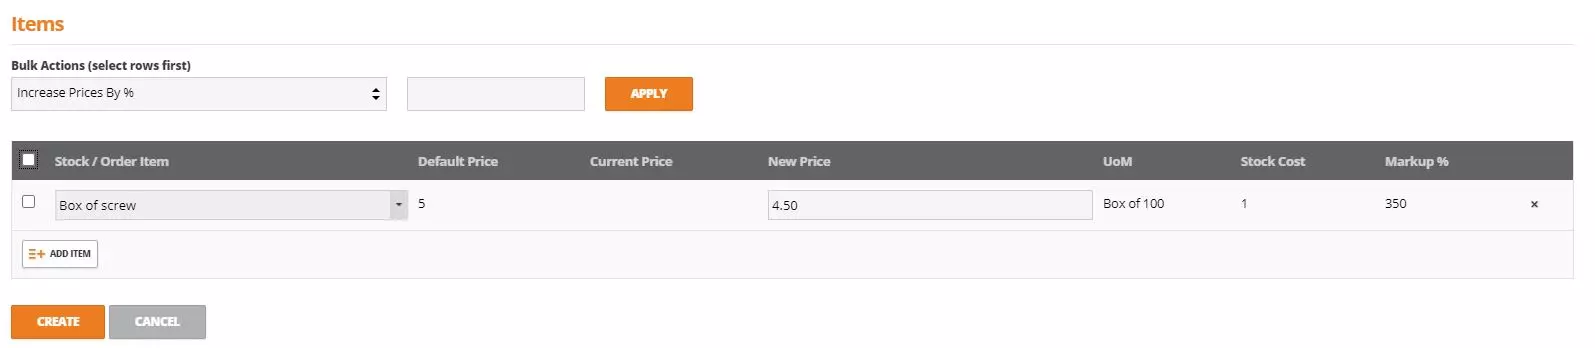
Within the items section configure the stock items and prices to be applied. Add an item and search by code or name then record the price list price in the ‘new price’ field. Prices can be updated in bulk against item lines by selecting the check box against the items in the table then select the bulk action along with a value. When selecting apply all selected items will be updated.
When creating quotes, order or invoices for an account that is on a price list a notification will display at the point you add the qualifying item, select ‘choose’ to enable the price list price else the standard price will be used and you cannot go back to the price list price.
Multi-currency discounts and price lists can be created by selecting the required currency code when creating the discount or pricelist.
Price list item lines can also be imported via a CSV if required.
Not Already An Advanced Business Cloud Essentials User?
If you’re struggling with the challenges of running a manufacturing business and looking for solutions then Advanced Business Cloud Essential could be the answer and we even offer a free review of your business’ processes to understand which software system could help you.
Our advice and guidance is always free and we’re happy to talk to any business, no matter what stage of the thought process their going through. We have built our business on the values of trustworthiness and passion and will happily provide assistance to you, so if you want a chat, just get in touch.