

Chapter 9: Banking
Bank Accounts
Navigate to Bank > Bank Accounts
In business cloud all current accounts, loan accounts, credit cards, cash and director loan accounts need to be created under the bank account section of the system. Once created transactions can then be posted to and from the accounts. To create a new bank account select +new at the top of the bank account screen and populate the detail on screen.

Payments & Receipts
All transaction in / out of the bank MUST be recording in Business cloud by manually adding a payment or receipt record. The system is not integrated with any payment or bank accounts so no actual payments will be made when creating these records.
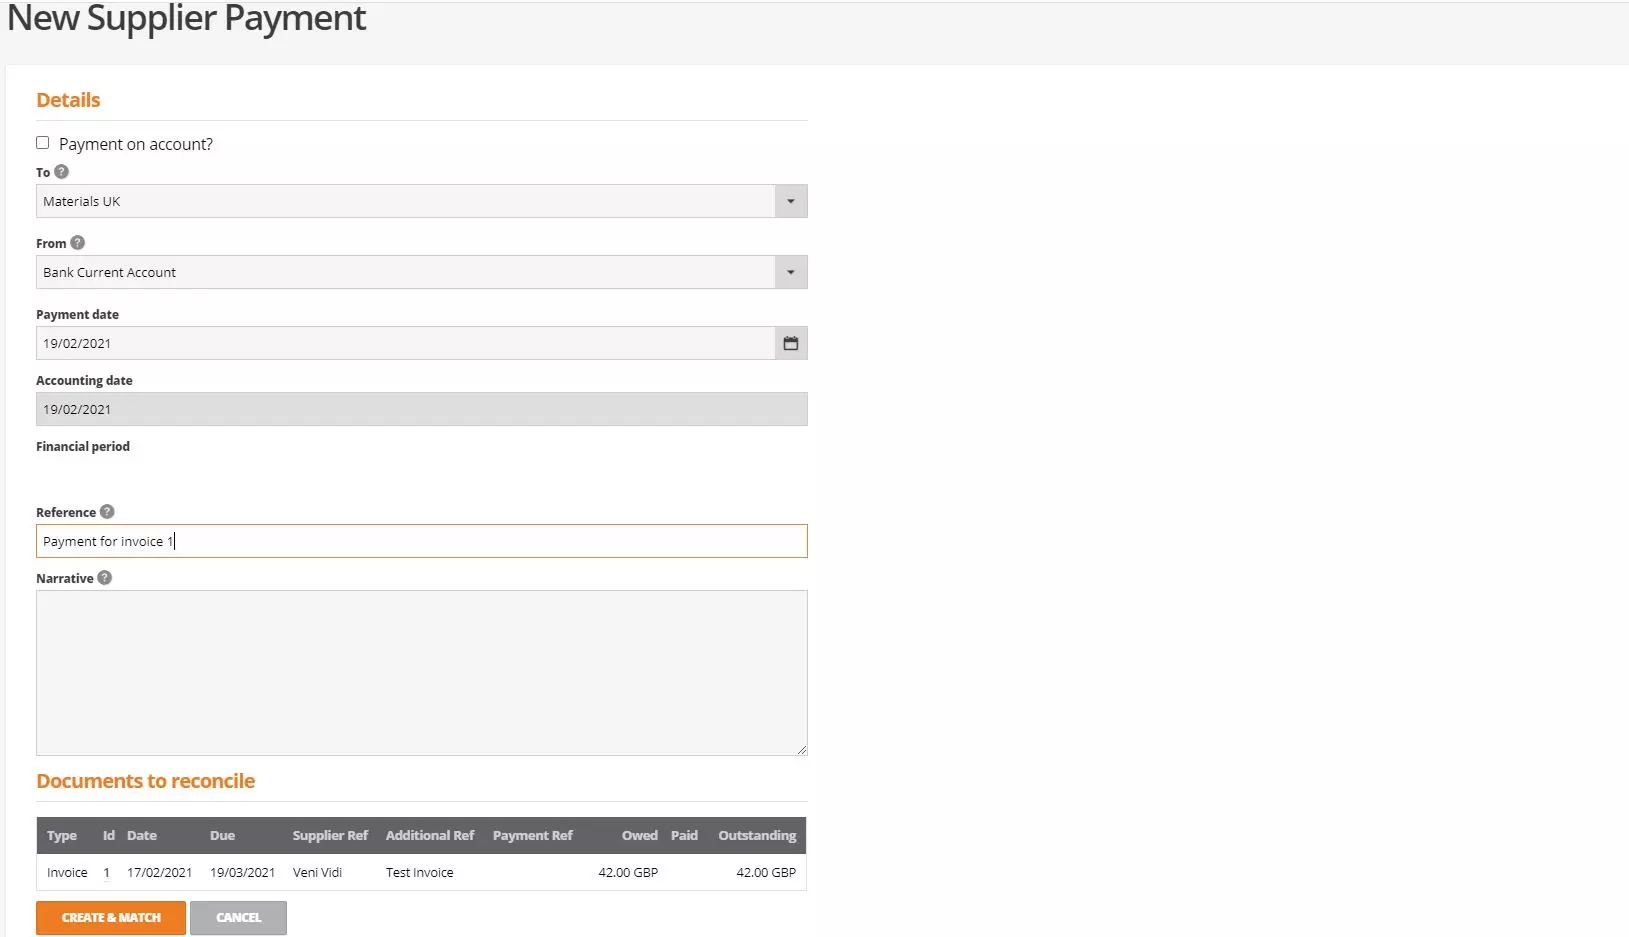
Payments: To create payments, select +new at the top of the payments screen and select the type of payment you want to create.
The type of payment selected will depend on the options shown within the payment screen. When the payment screen opens the user MUST first select if the payment is to be added to the account, leaving this option disable will allow users to go into the matching screen and select the invoice(s) the payment is being made for. Selecting this option will mean the users’ needs to record a value for the payment which will be added to the required account that can be matched to an invoice later. Before saving the payment confirm that the account for the payment to made to, from, date and references have been populated.
Receipts: To create receipts, select +new at the top of the receipts screen and select the type of receipt you want to create.
The type of receipt selected will depend on the options shown within the payment screen. When the receipt screen opens the user MUST confirm that the account for the receipt is being made to, from, date, amount, currency, and references have been populated. If the payment has CIS deducted this will also need to be confirmed before creating the record.
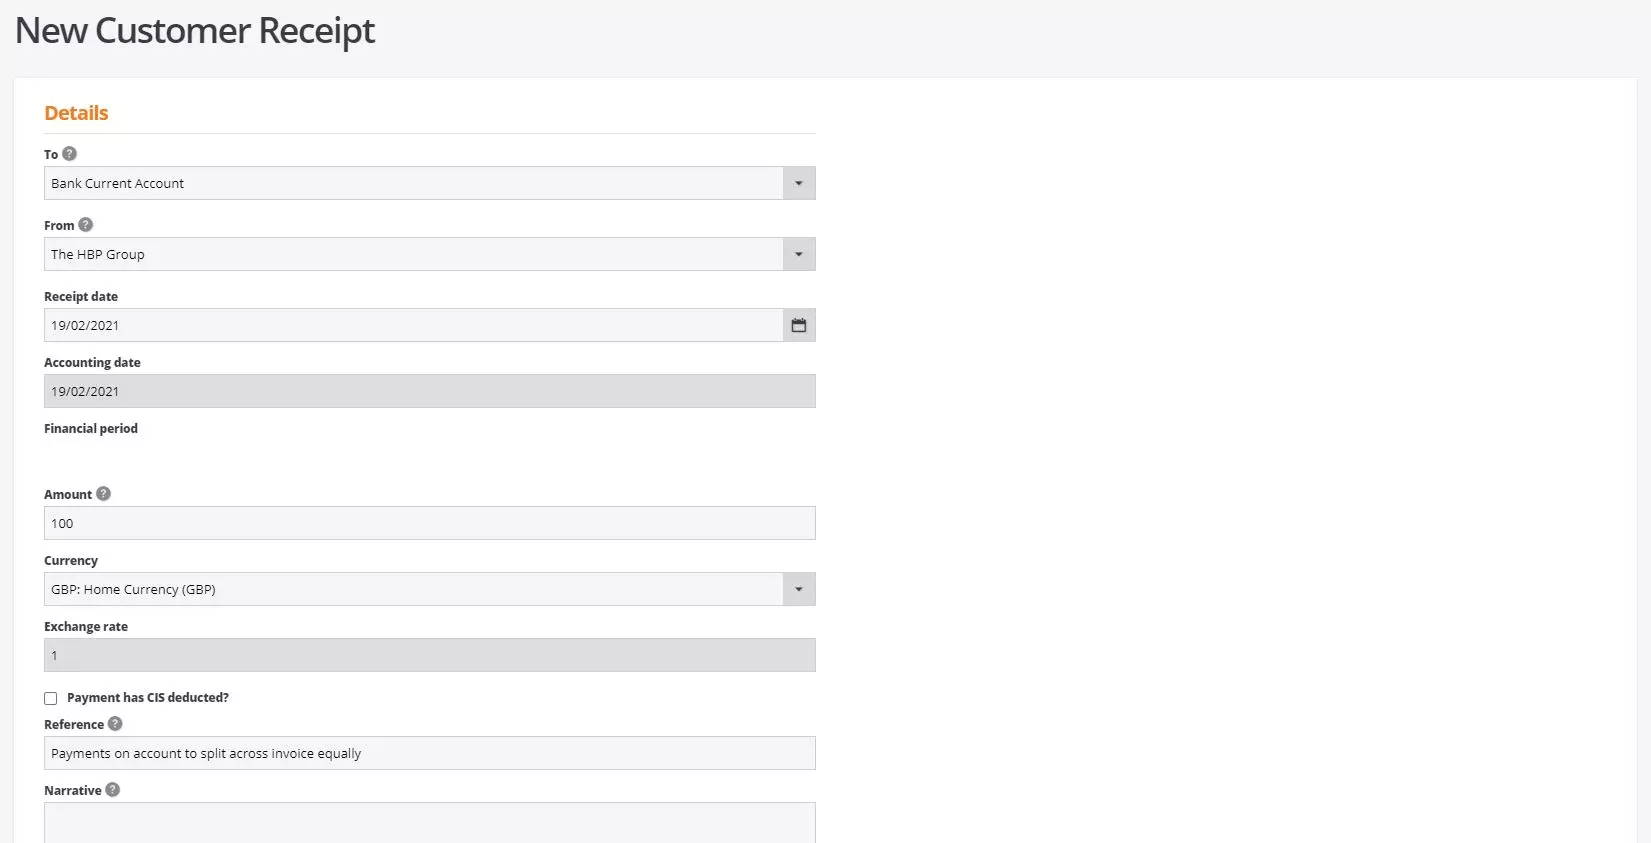
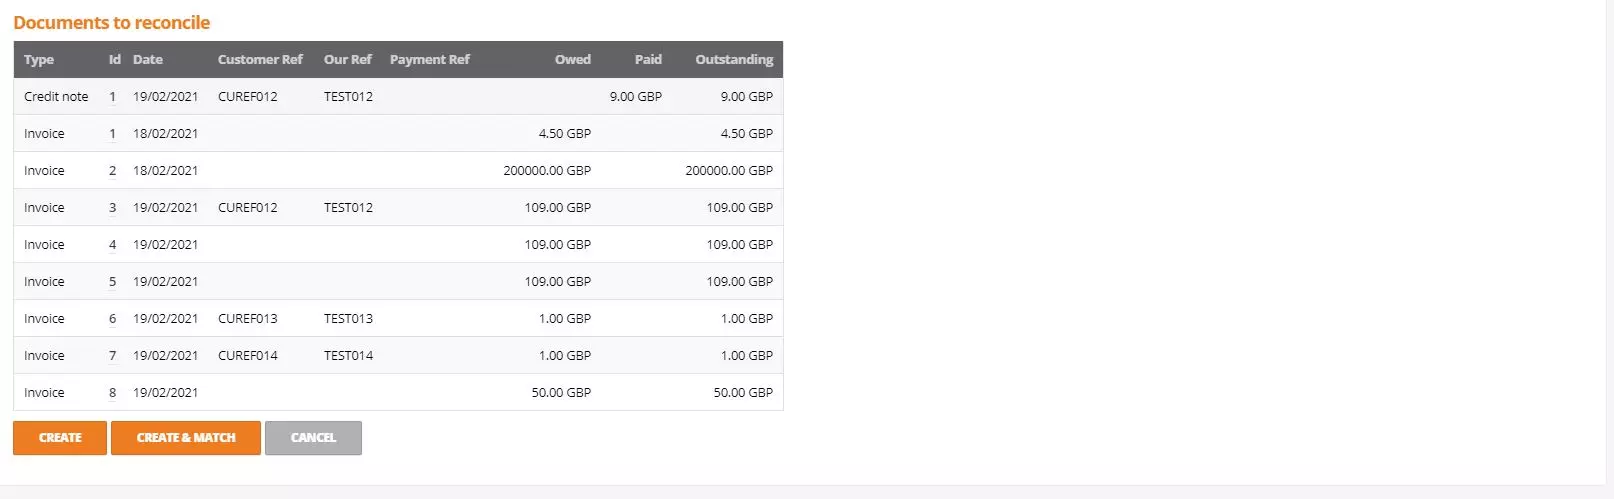
When creating a receipt record users can select ‘create’ which will record the receipt adding the record to accounts to be matched later or ‘create and match’ which will add the record to the required accounts but will allow users to match it against invoices/credits instantly.
Transfer funds between bank accounts
As all payments going in or out of the bank too recording so do any transfers between accounts. Bank transfers work similar to payment records. To create a new transfer record select bank transfer at the top of the bank account screen. This will open the transfer record for users to detail which bank the transfer is being made TO and where the transfer will be coming FROM along with the amount being transferred. The currency and exchange rate will be prepopulated as per the bank account setting, however, can be amended selecting from the available drop down.

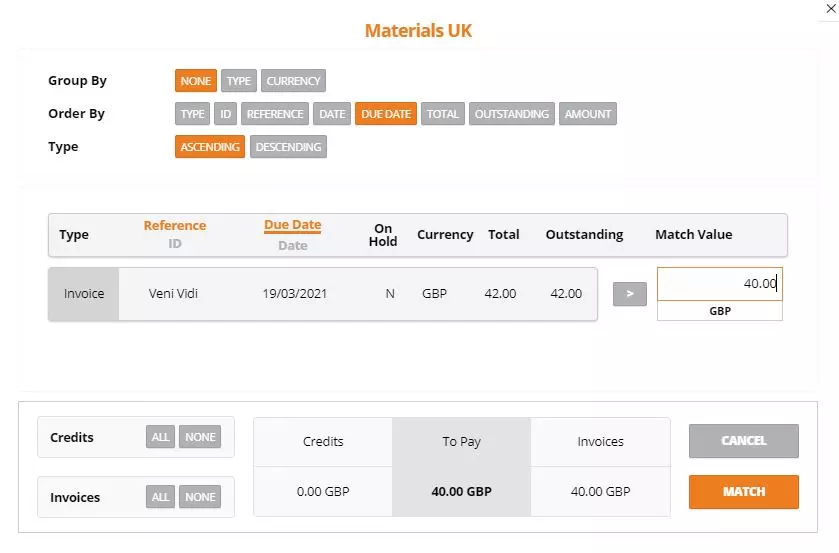
Matching Financial Documents
Matching financial documents allows users to match payment and receipts to credits and invoices. This can be done from the payment or receipt creation or from within the customer or supplier account record selecting ‘match financial documents’ under the general tab. Both ways will display the same matching screen and the process is the same either way.
When the matching screen loads, users can sort the data by selecting necessary options from within the filter section. This includes group by, order by, and displaying results in ascending or descending. Once data has been filtering, users can further customise the results showing either reference, ID, document date or due date. Underlined text in orange is what is being shown and can be changed.
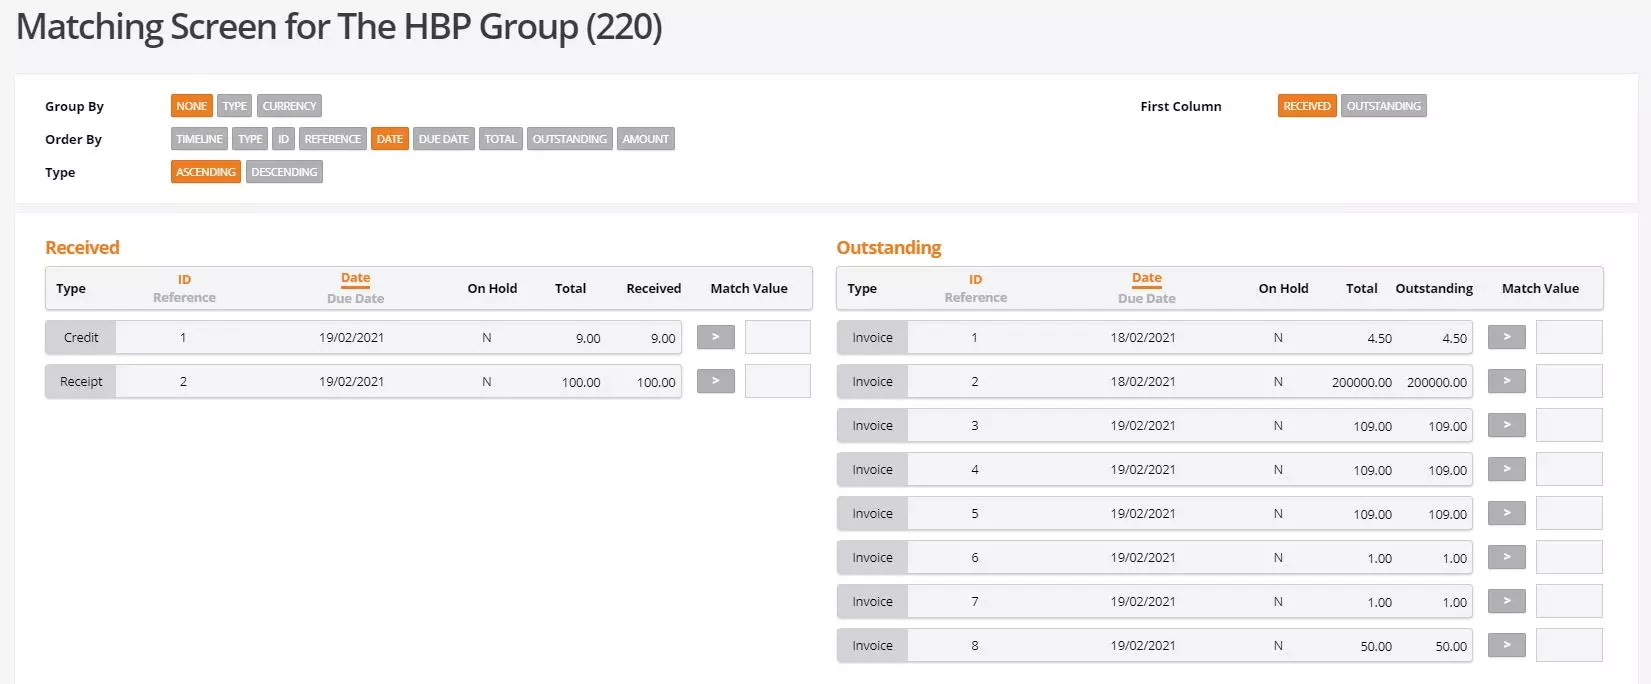
Received documents will show all document outstanding against the account for records coming in such as payments, receipt and credits. Outstanding documents will show all outstanding document against the account for records going out which as payments, receipt and invoices. The idea of the matching screen is to match document values from the received table with document values from the outstanding table. This can be done using the full document value or using part of the document value.
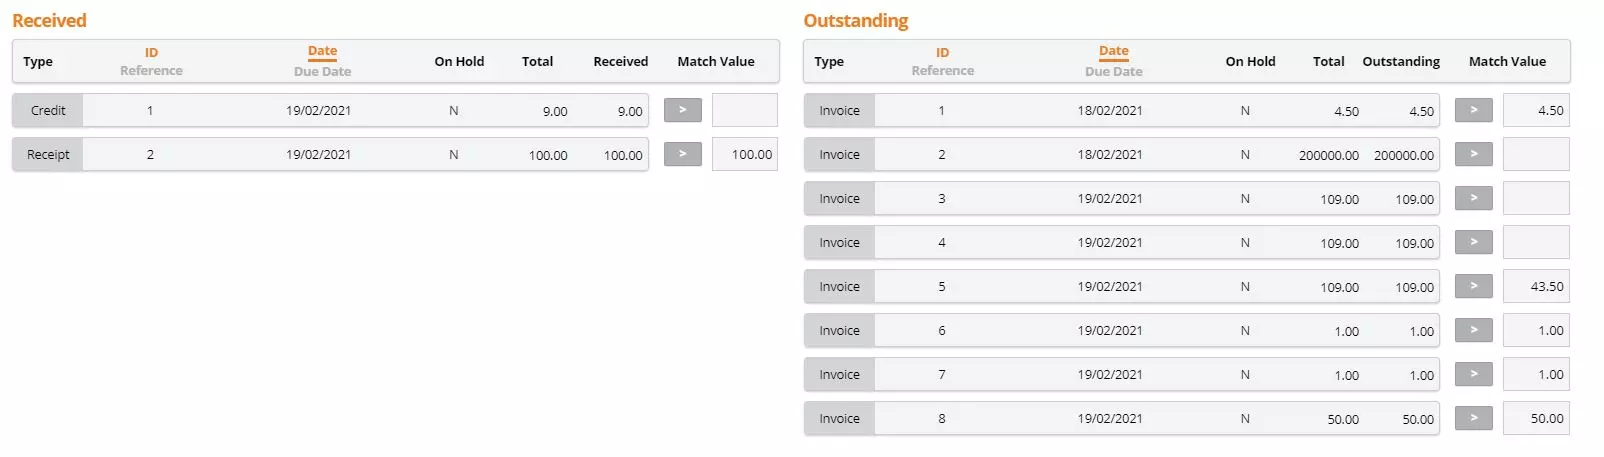
Once matching has been completed, users can confirm this at the bottom of the screen looking at the total received against a total outstanding. These two totals should match however if they do not, then a total difference will show and this can be written off if required.
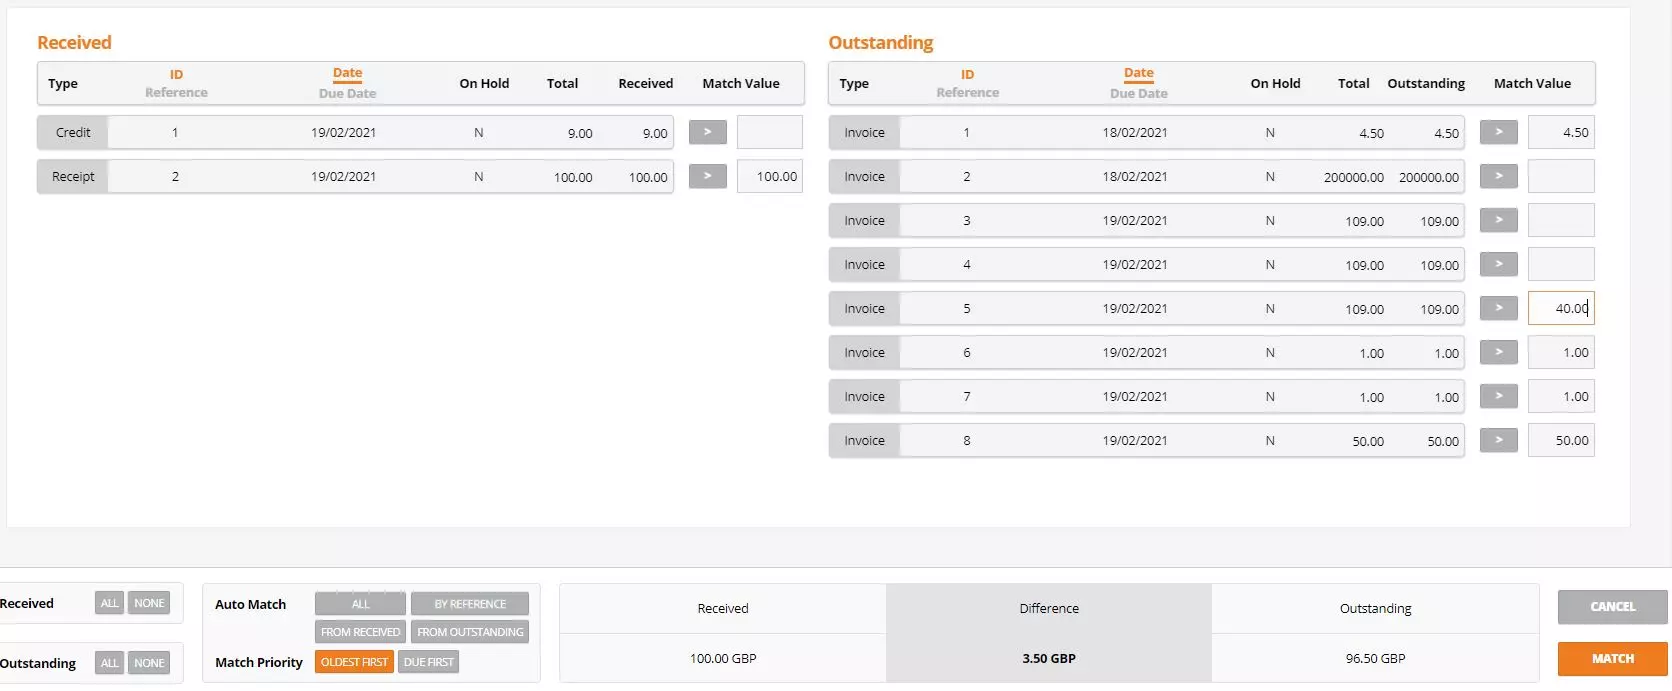
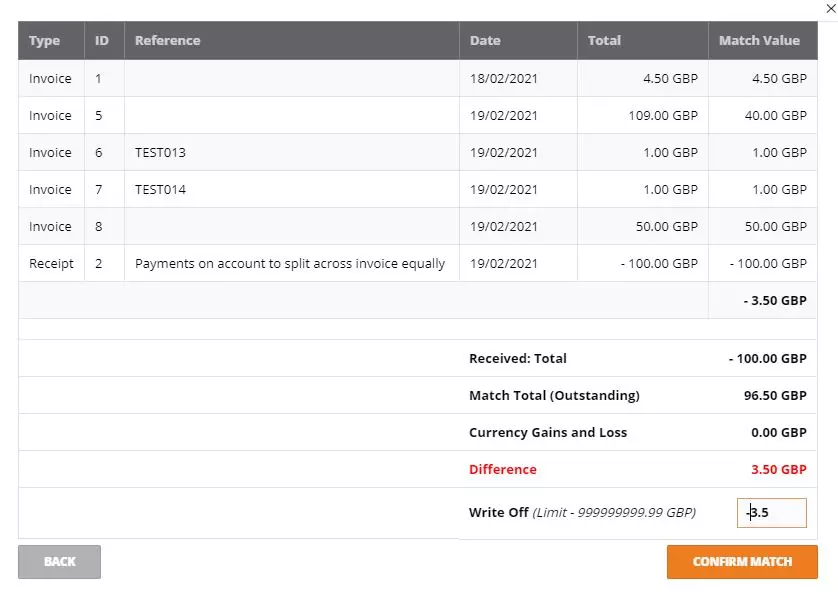
Once happy with the matching sets users can select Match, which will display the matching confirmation screen for users to confirm and save. If there is a difference showing, this can be written off but only if the user has the necessary user permissions. All write off will be accounted for within the chart of account under the ‘write offs’ account nominal.
Once the matching set has been created a transaction record will be stored against the necessary account and can be viewed / unmatched later if required. To view / un match sets navigate to the account in question select documents and transactions and scroll to the bottom of the screen.

Import Bank Statements
Navigate to Bank > Bank Accounts > Select Bank > Actions > Import Transactions
To make bank reconciliation easier and more accurate, business cloud has the functionality to import bank statements that will display all actual bank account transactions against all system account transactions recorded. This allows users to confirm all payments and receipts have been recorded in the system correctly.
The bank account statements being imported MUST be on a CSV file. The system allows users to select a bank import type however if the bank account type doesn’t display then there is a generic CSV type that be selected where users will be able to browse to the CSV files and tell the system which columns the necessary data is held in.
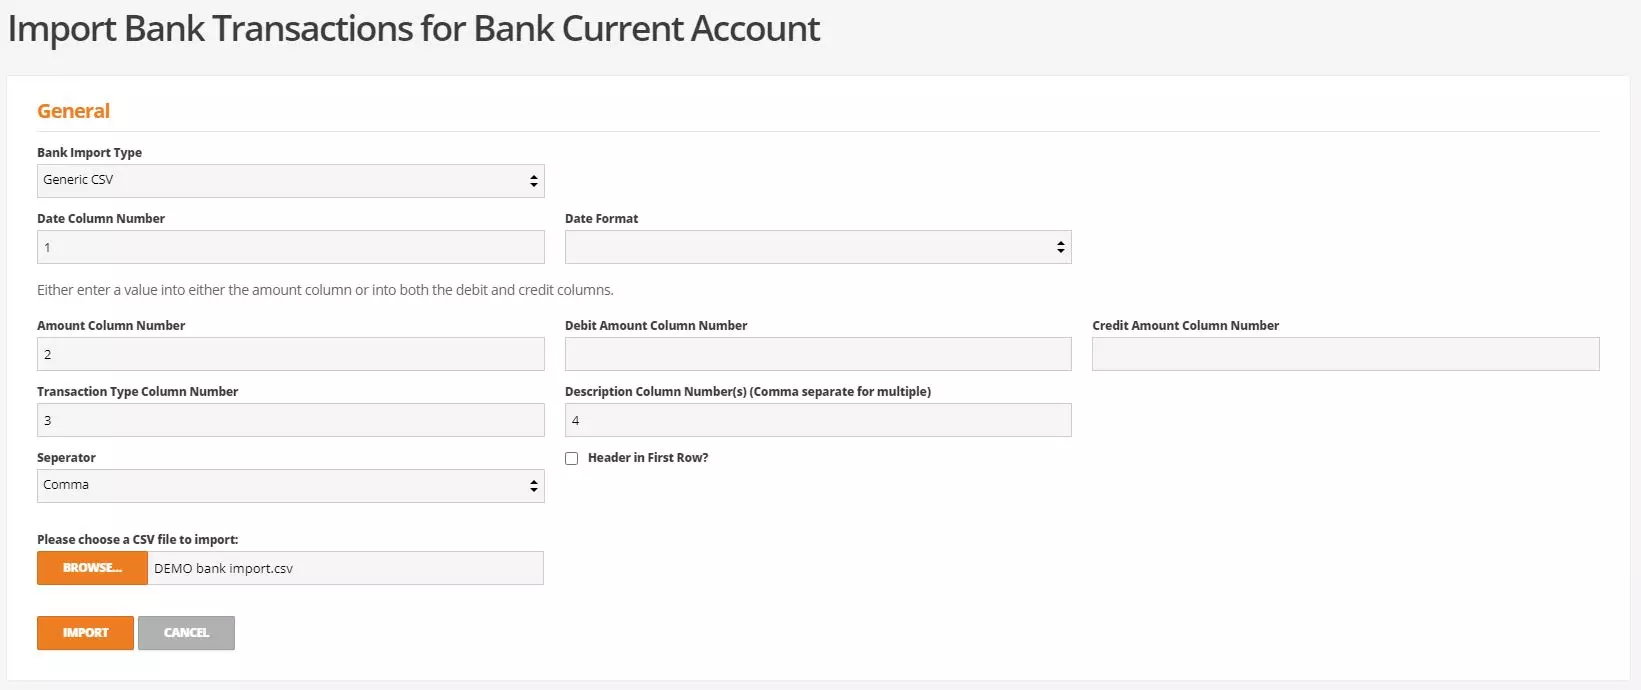
Once happy select import, the transactions being imported will then display on screen to be confirmed and once happy users can select import which will add the records to the bank reconciliation screen.
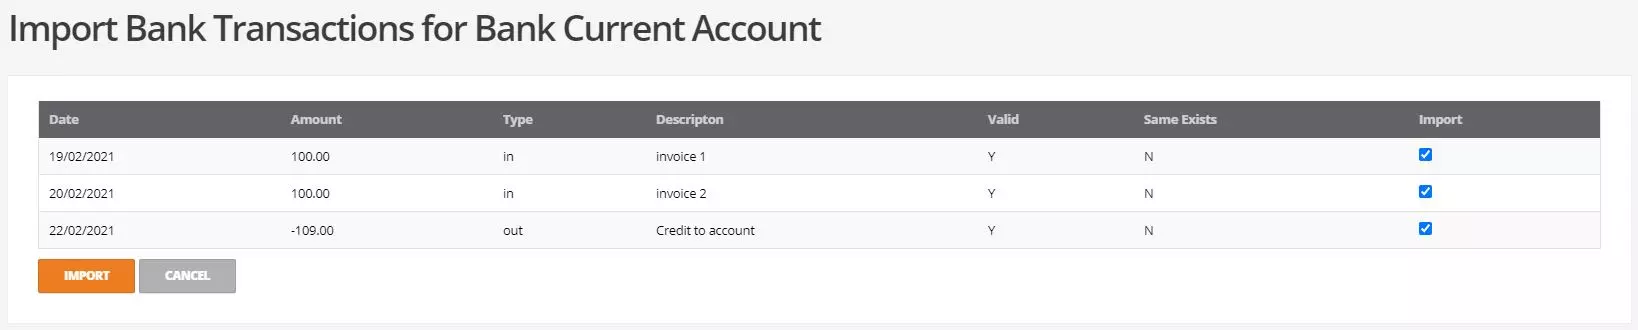
NOTE: importing bank statements only imports the transactions as records to reconcile system recorded transactions against. It will NOT create payments/receipt transactions in the system.
Bank Reconciliation
Navigate to Bank > Bank Accounts > Select Bank > Actions > Reconcile Bank
The bank reconciliation screen is split into 3 sections, general, payments and statement totals. The general section details the statement start date and your staring values against anything you have reconciled in/out of the bank. The payments section show local system transactions and imported bank statement transactions. There is then another statement totals section shown at the bottom of the reconciliation screen to be confirmed before reconciling the bank.
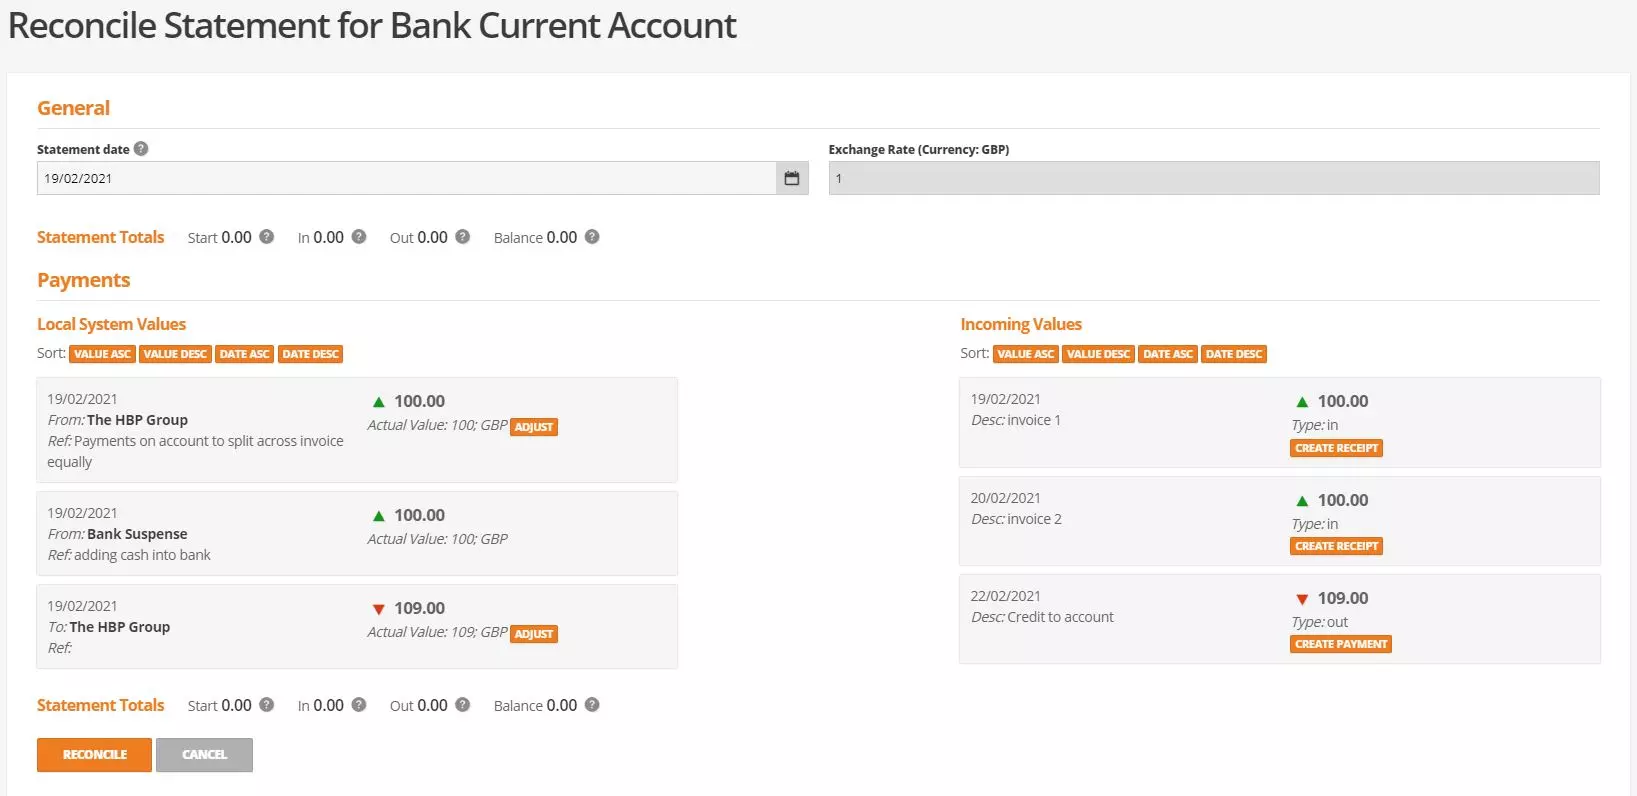
Transactions can be sorted in value or date order, making it easier for users to work through selecting transactions from the local system and matching them against the bank statement transactions. Once both records have been selected the user can link them as shown below.
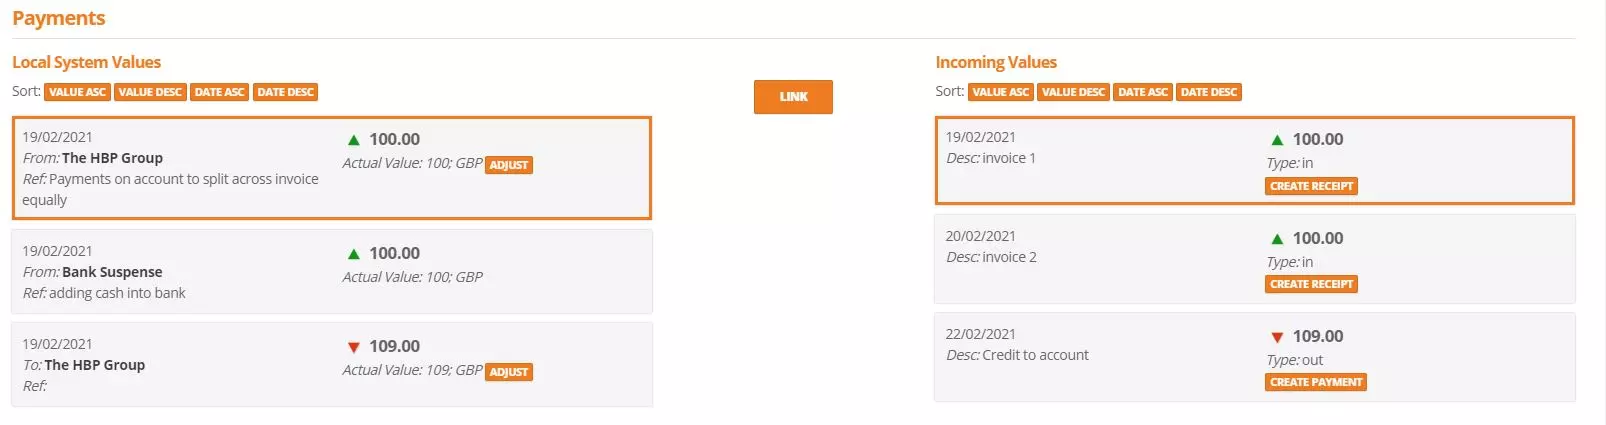
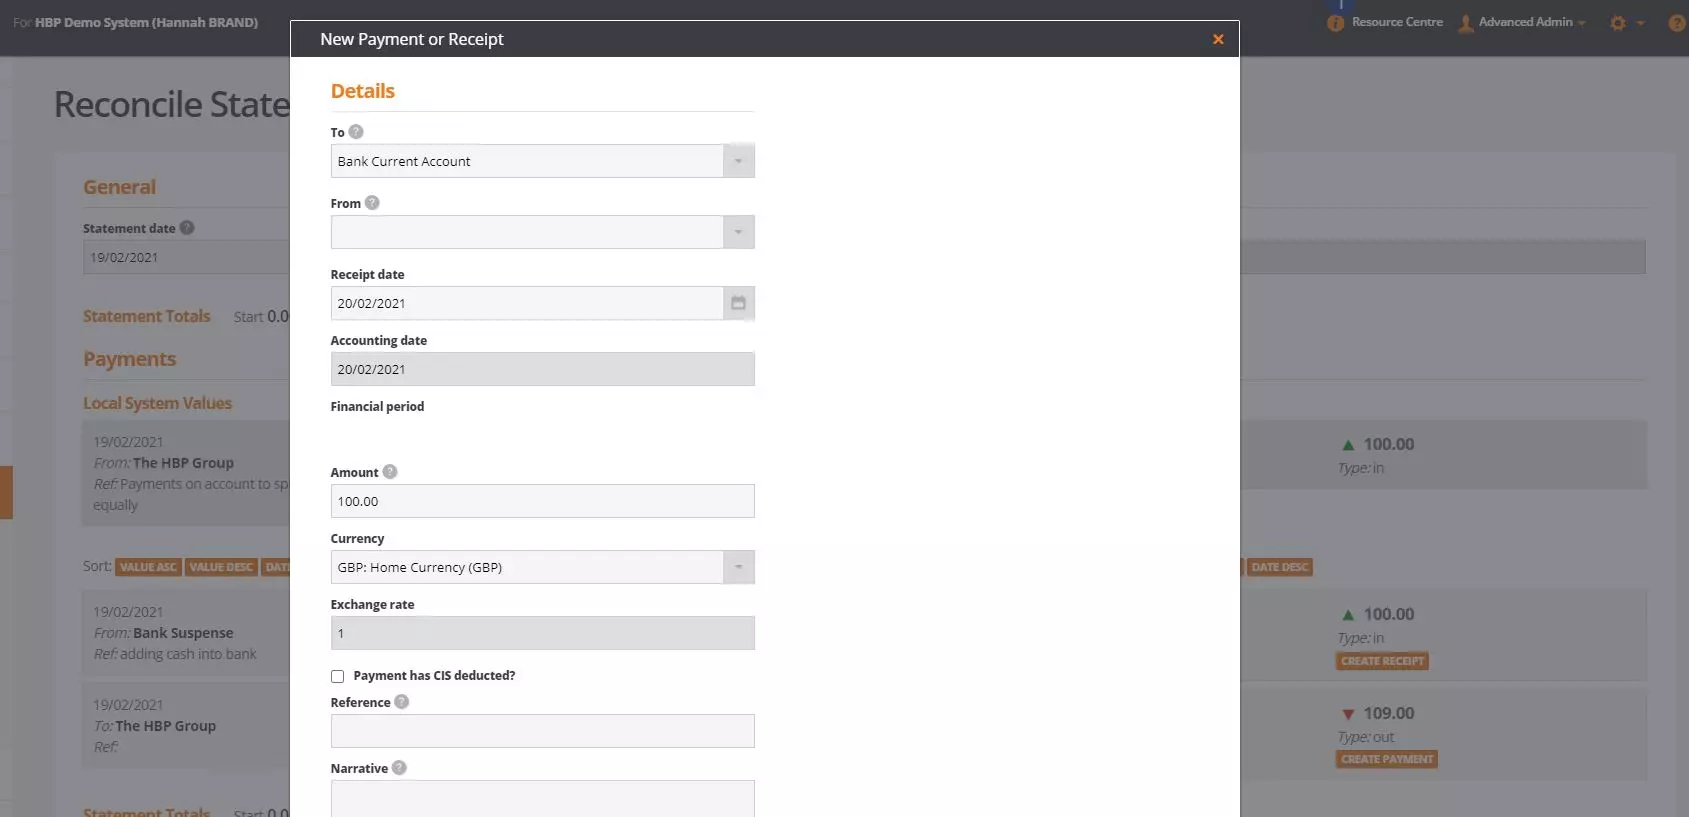
If there is a transaction on the bank statement that has not been recorded in the local system, users can select create payment or receipt against the transactions which will open the nessery screen to record the transaction in the system. This will then display against the local system and can be reconciled.
If there has been a transaction created in the system and the value is different on the statement this, if this is an error it can be adjusted easily from the reconciliation screen selecting ‘adjust’ against the transaction.
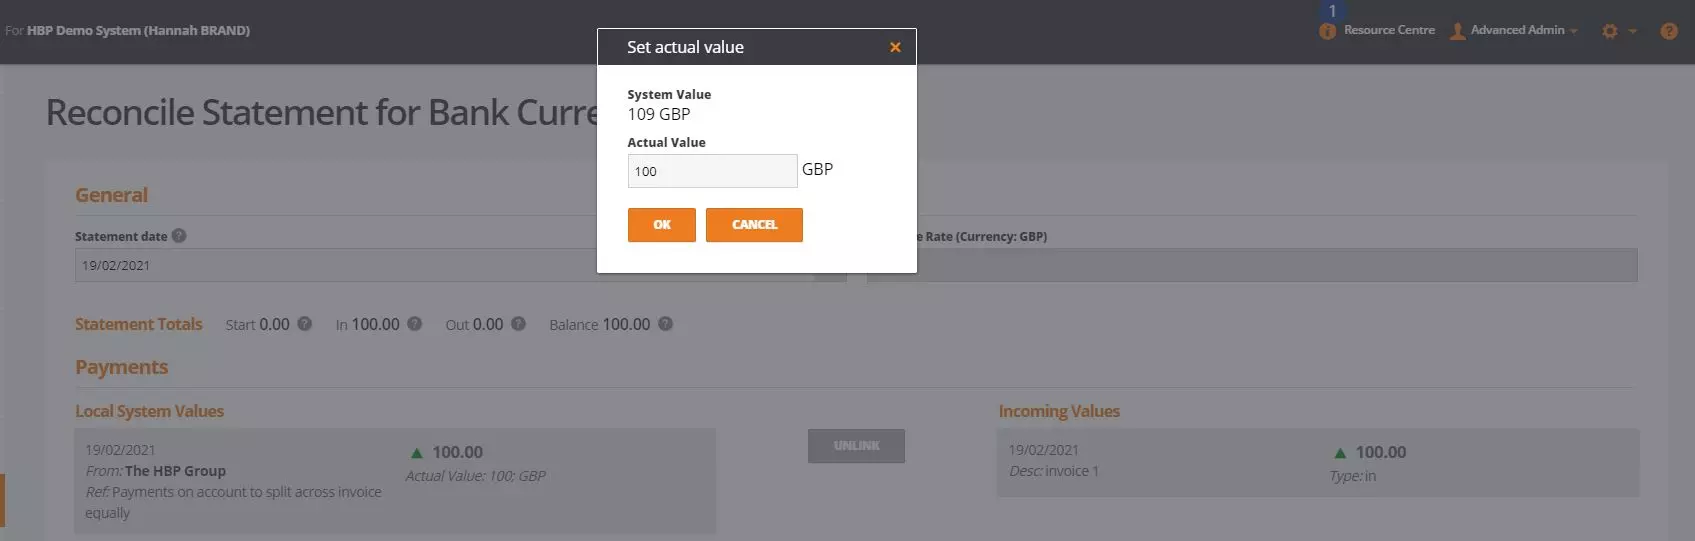
Once users have completed the reconciliation the balance amount within the statement totals should match your actual bank balance. Once you are happy, select reconcile, the reconciliation will be stored against the bank for future reference and the statement total can be viewed on the bank account screen under the last statement column.
Supplier Payment Run
Navigate to Bank > Supplier payment Run
As well as creating payment transactions manually in business cloud, a supplier payment run can be created which will look at a list of selected suppliers and their outstanding invoices to create one payment transaction for all records instead of the users having to create multiple single payment transactions.
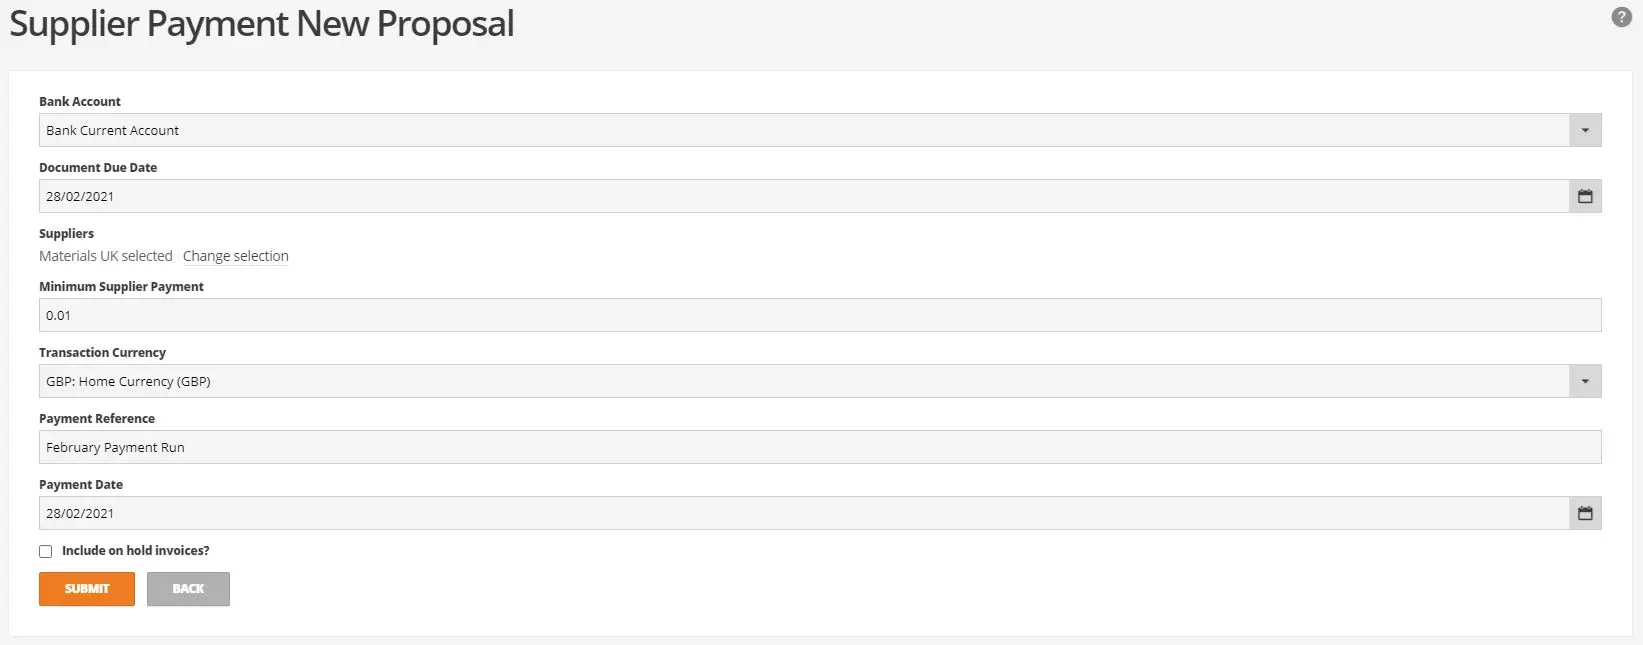
To create a new supplier payment run select +new run at the top of the supplier payment run screen. This will open the supplier payment proposal screen for users to select the bank account for the payments, the due dates of invoices to include along with selecting the supplier accounts to look at. The currency will default to GBP however can be amended by selecting one from the available drop down. A payment reference and date can also be recorded which will be applied against all payments created within the run.
Once happy, users can select submit which will open the supplier payment run screen. The top of the screen shows the selection and reference recorded on the previous screen and the payment reference and payment date can be amended here if required. Under this all-supplier account with outstanding document will show and users can order the data using the filter settings order by, type and show.
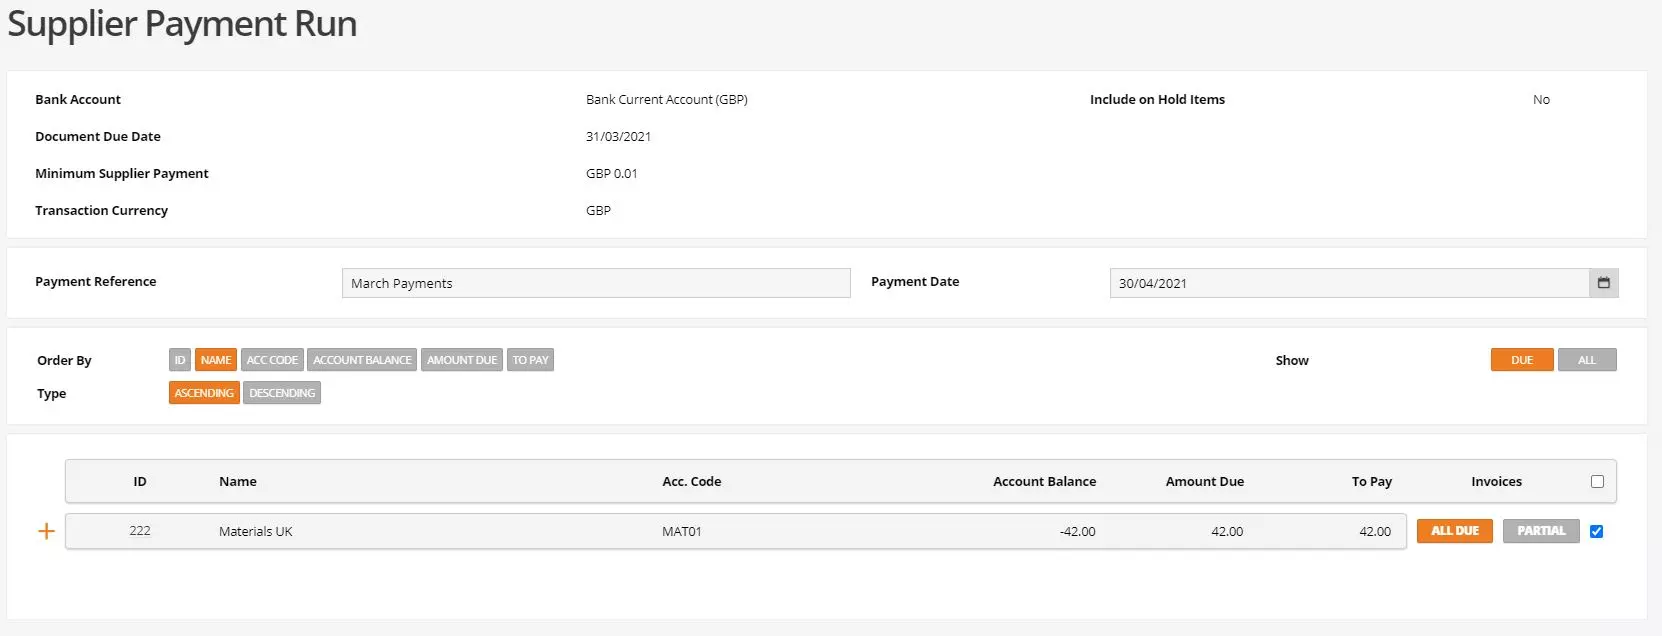
By default all suppliers and all due invoices are selected however select the [+] icon against a supplier to drill down into the outstanding invoices and confirm which you do / do not want to be included in the payment run and select either FULL or PART for payment values.
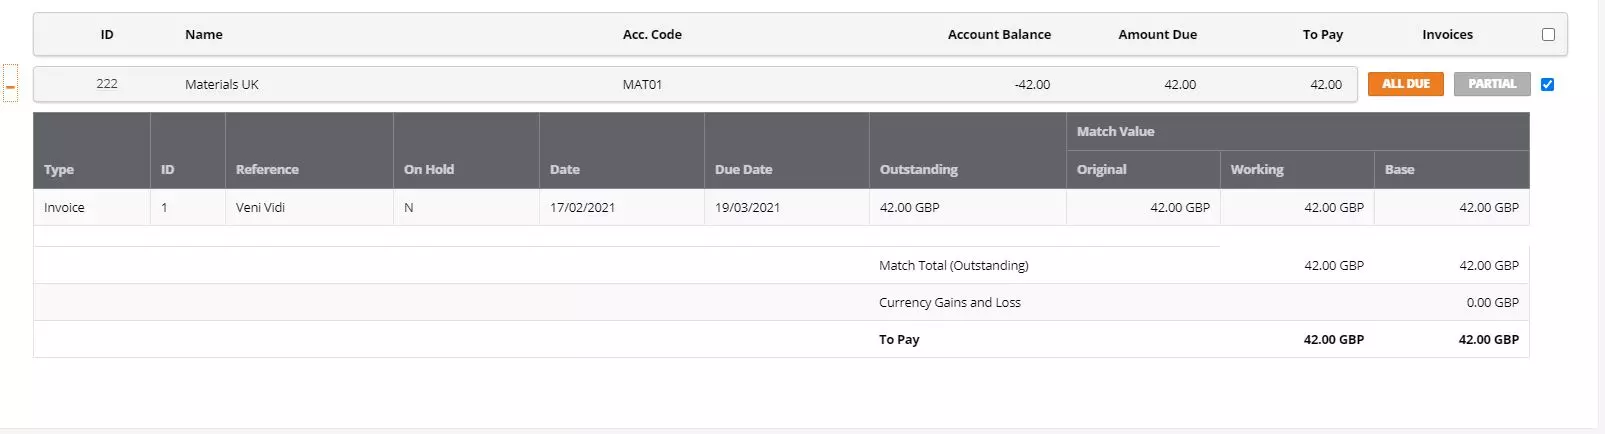
To include PART of an outstanding invoice within the payment run select PART which will open the PART payment screen to detail the value of the invoice you want to include.
Once ready select SAVE which will show the invoices to pay screen to confirm what payment will be created and what invoices it will be matched against. Select PROCESS RUN to complete.