Chapter 6: Production Creation, Planning & Processing

Chapter 6: Production Creation, Planning and Processing

Resources

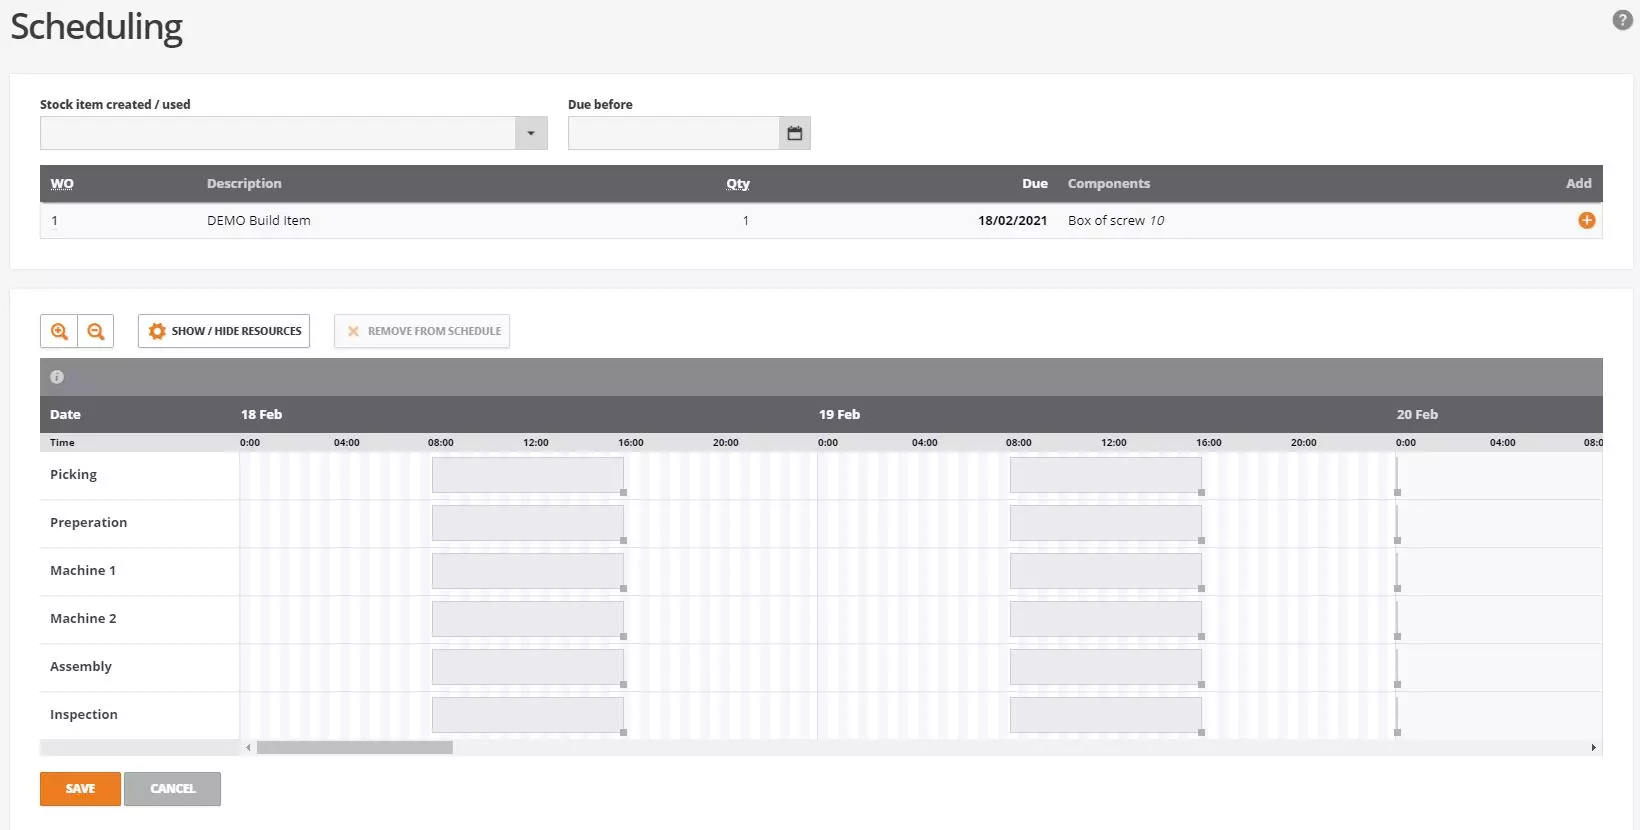
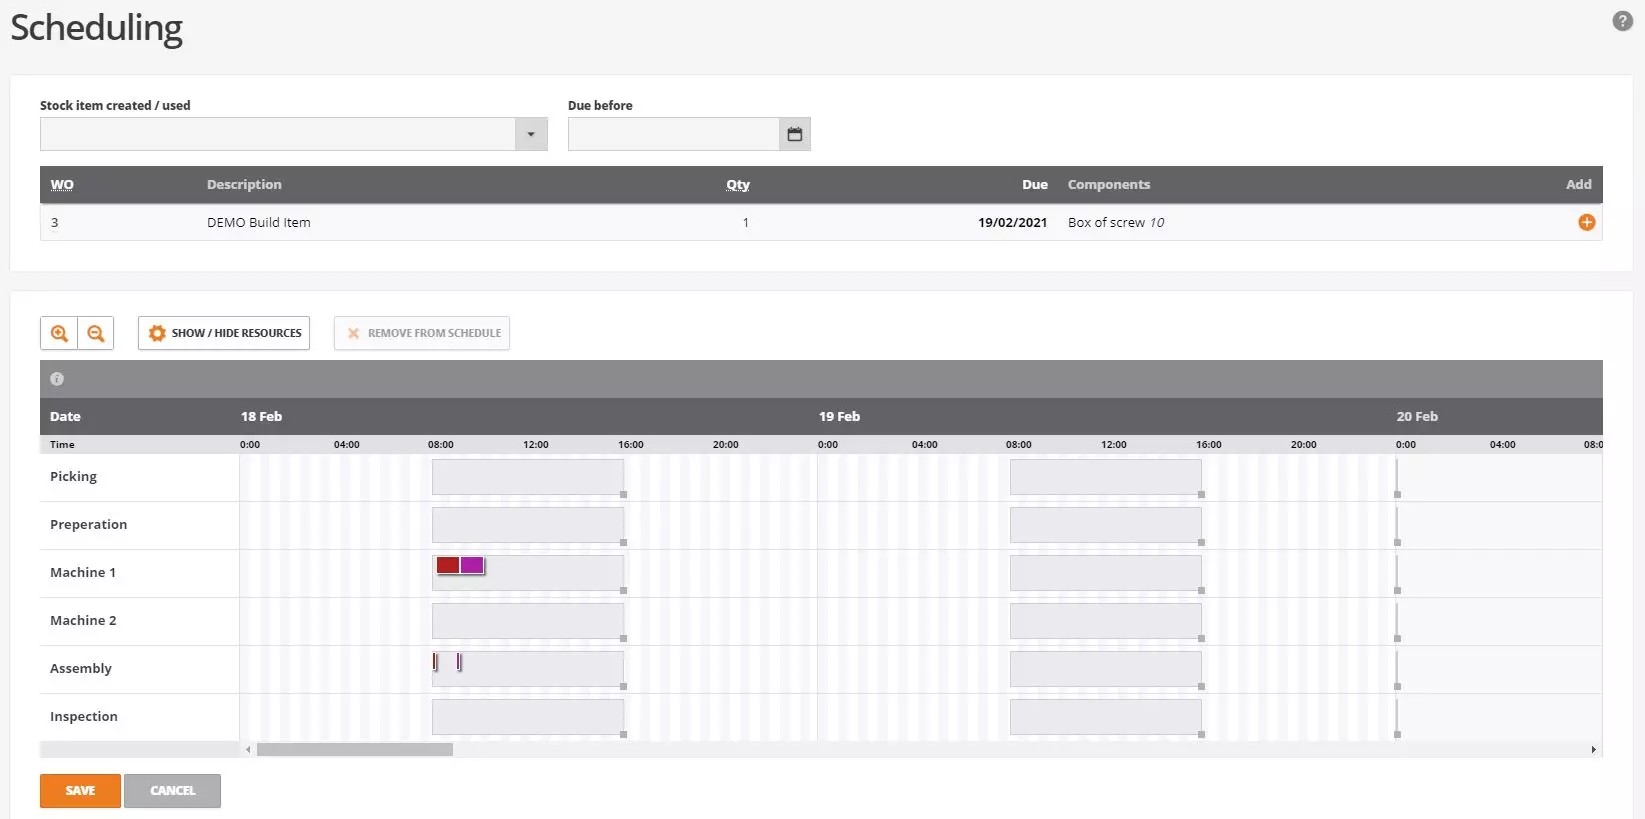
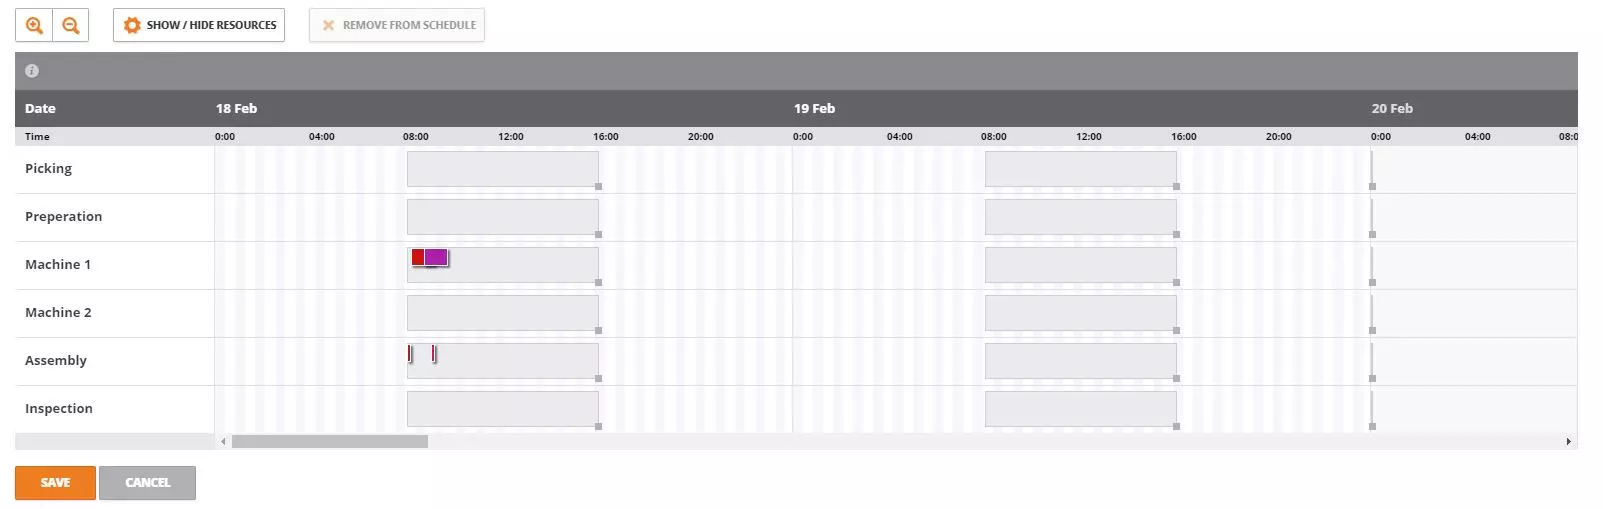
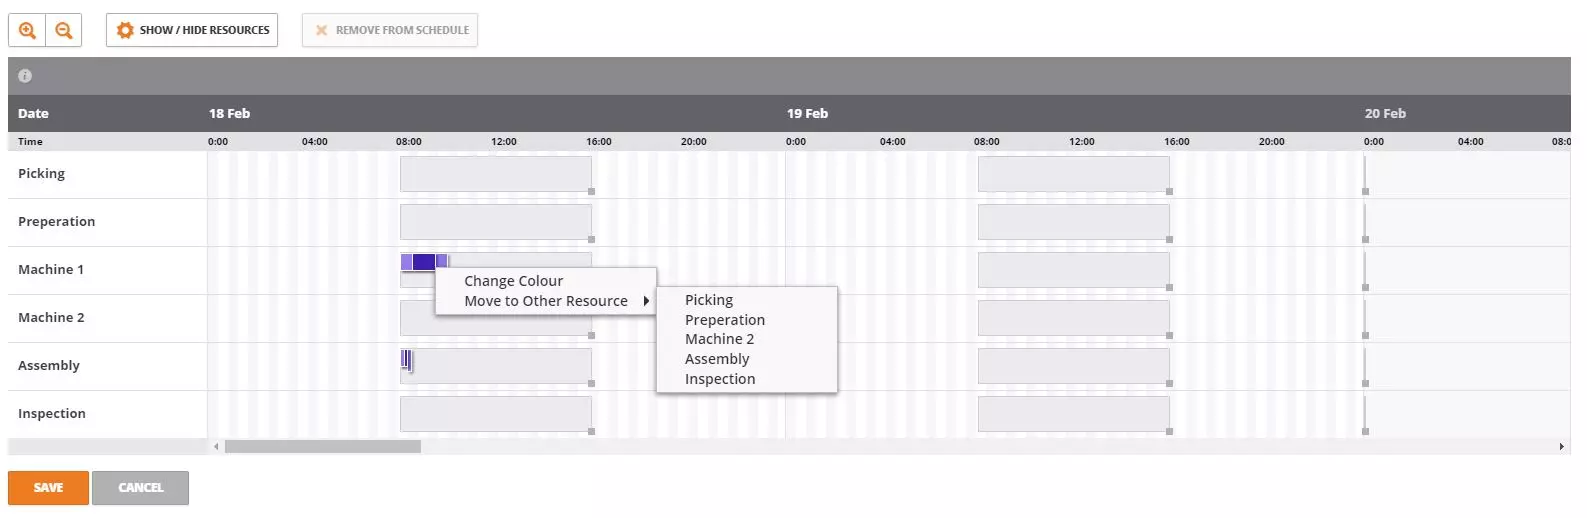
Navigate to operations > resources
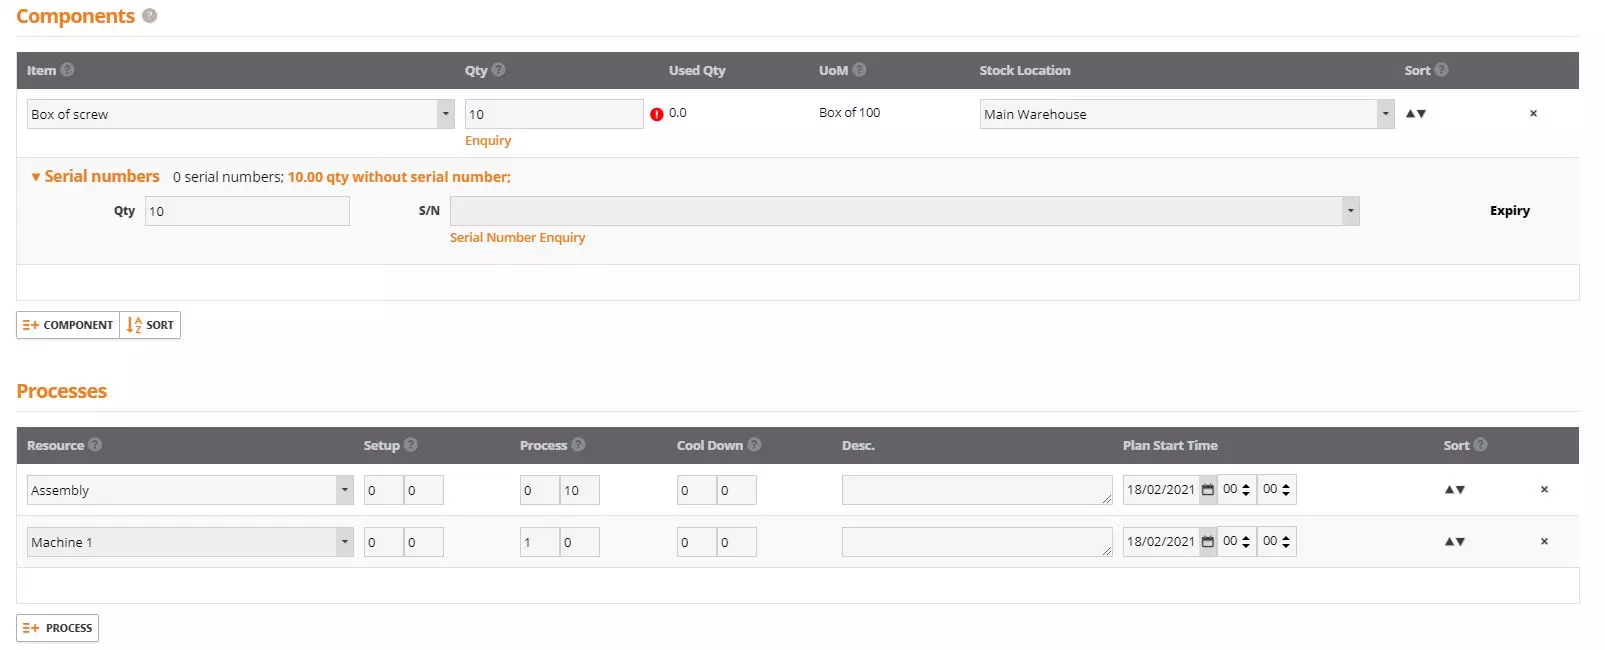
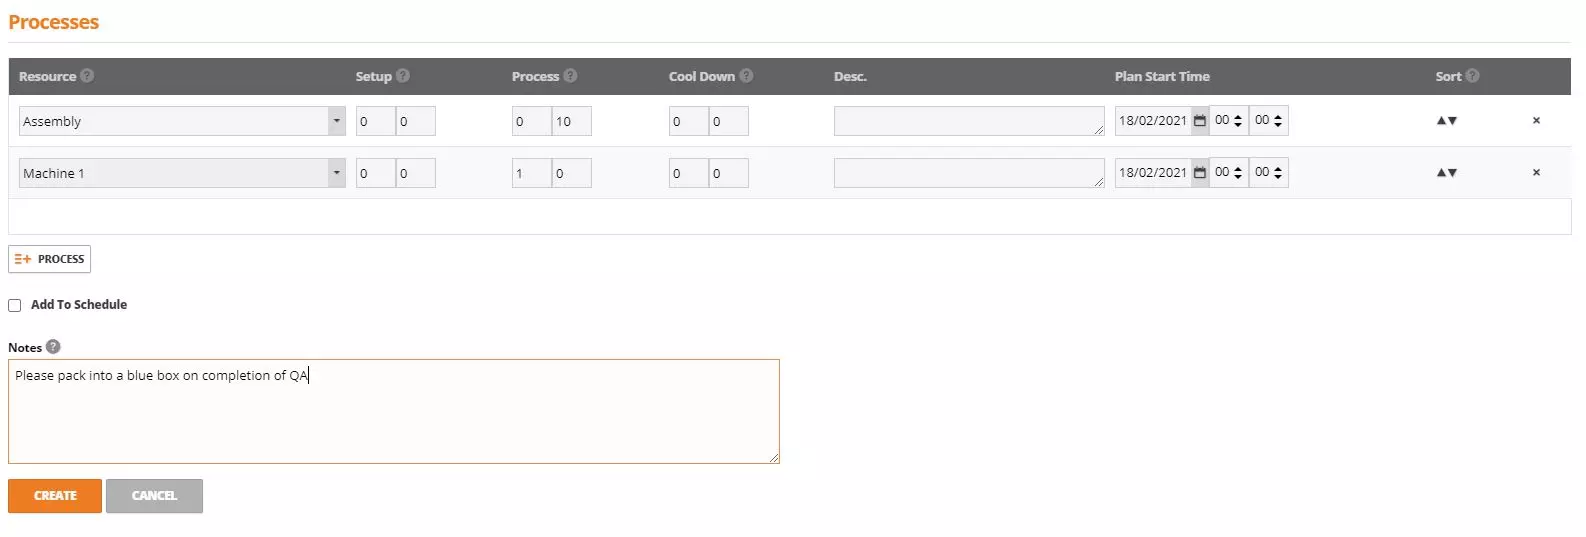
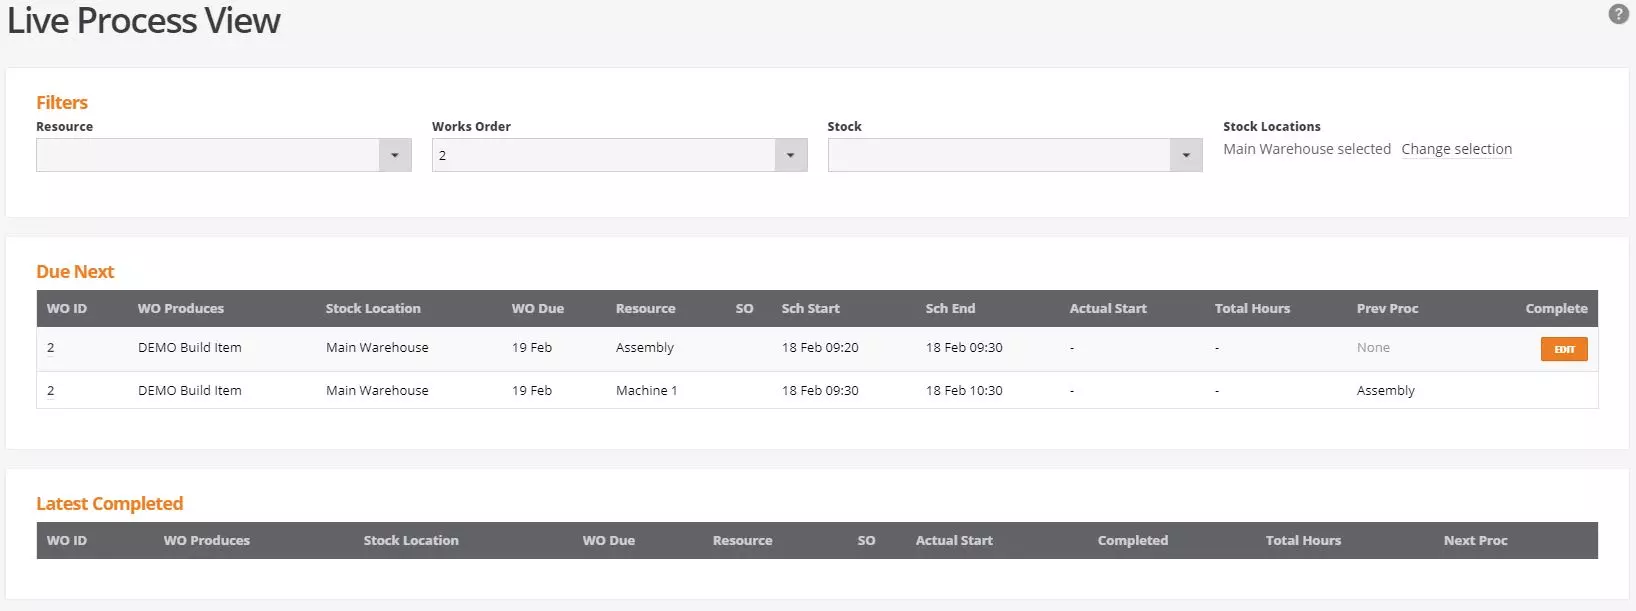
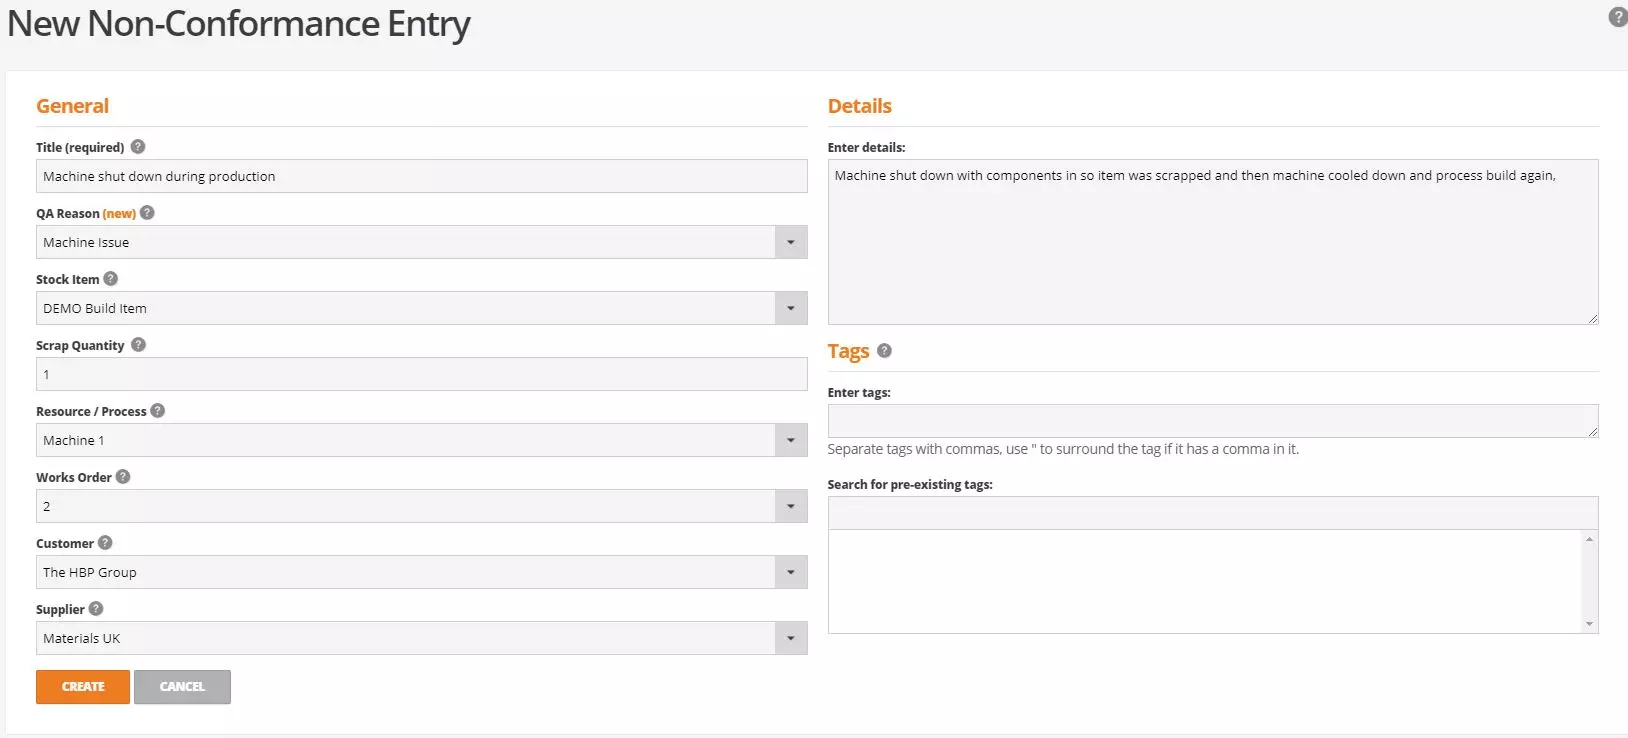
Resources are used in business cloud to trace time and cost of a process or group of processes within production. Resources can comprise of a single machine, groups of machines, individual employees, or any other processes used in production.

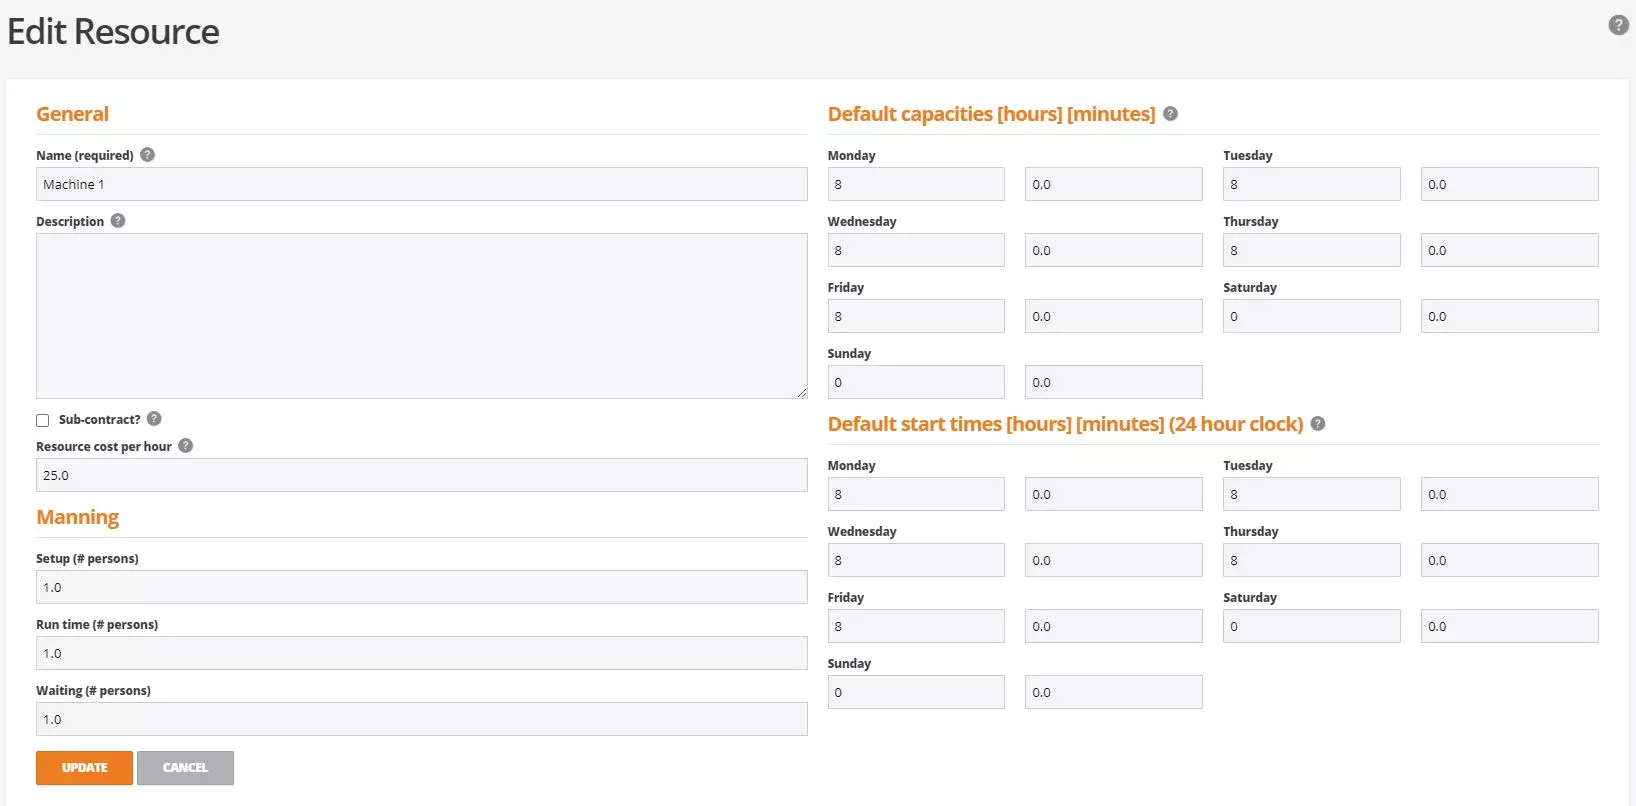
To create resources, navigate to the resources screen and select +new at the top of the screen. Assign the resource a name, description, cost per hour, manning details and default start time and capacity hours. The start time and capacity hours will influence the scheduling screen so should be are as accurate as possible.


Manufacturing Screenshot


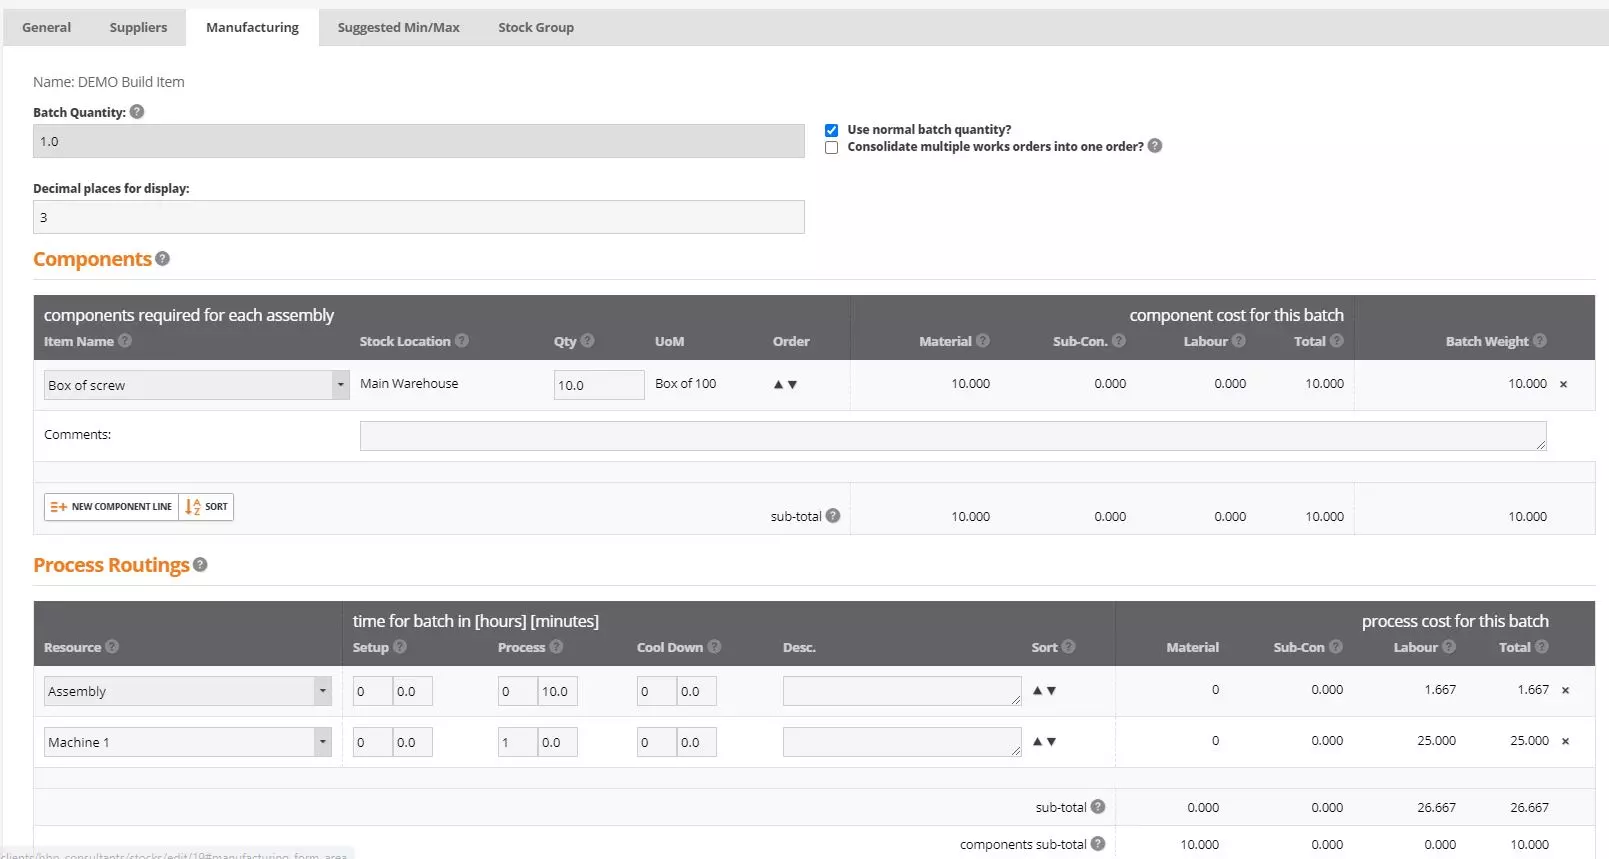
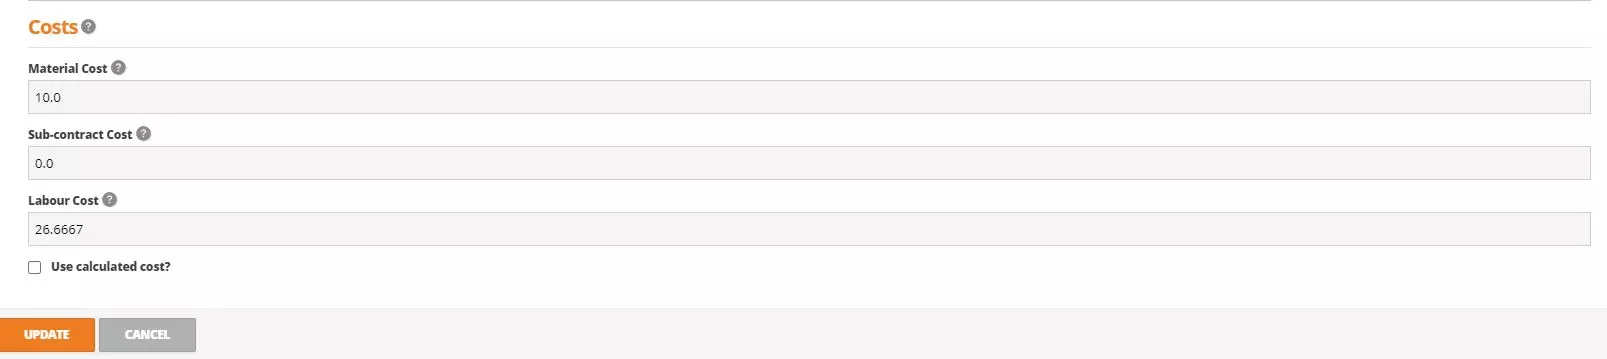
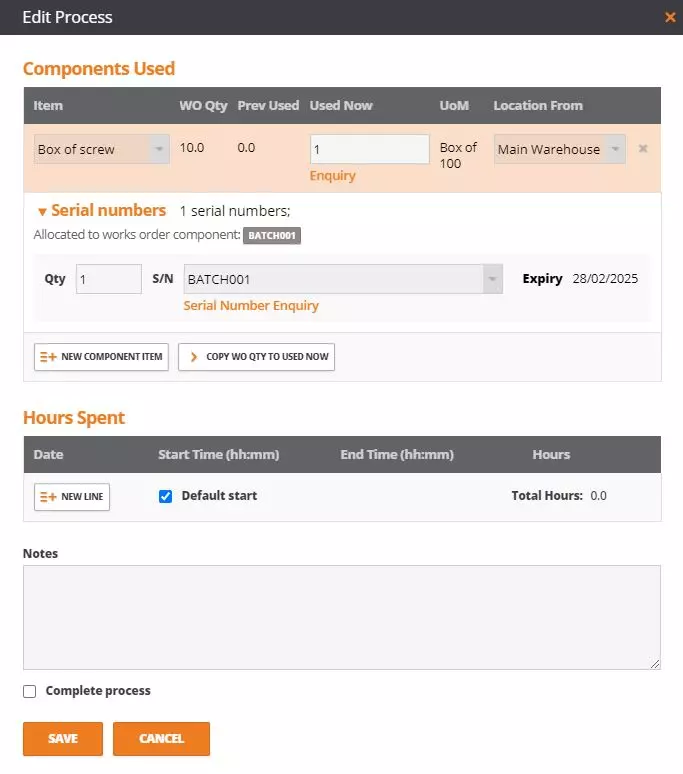
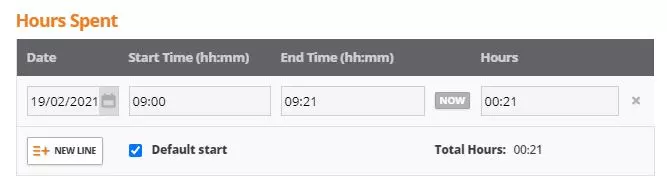
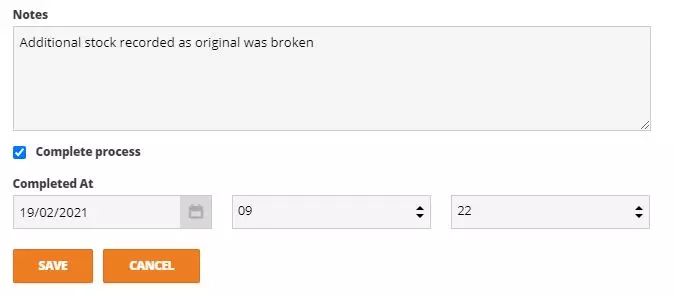
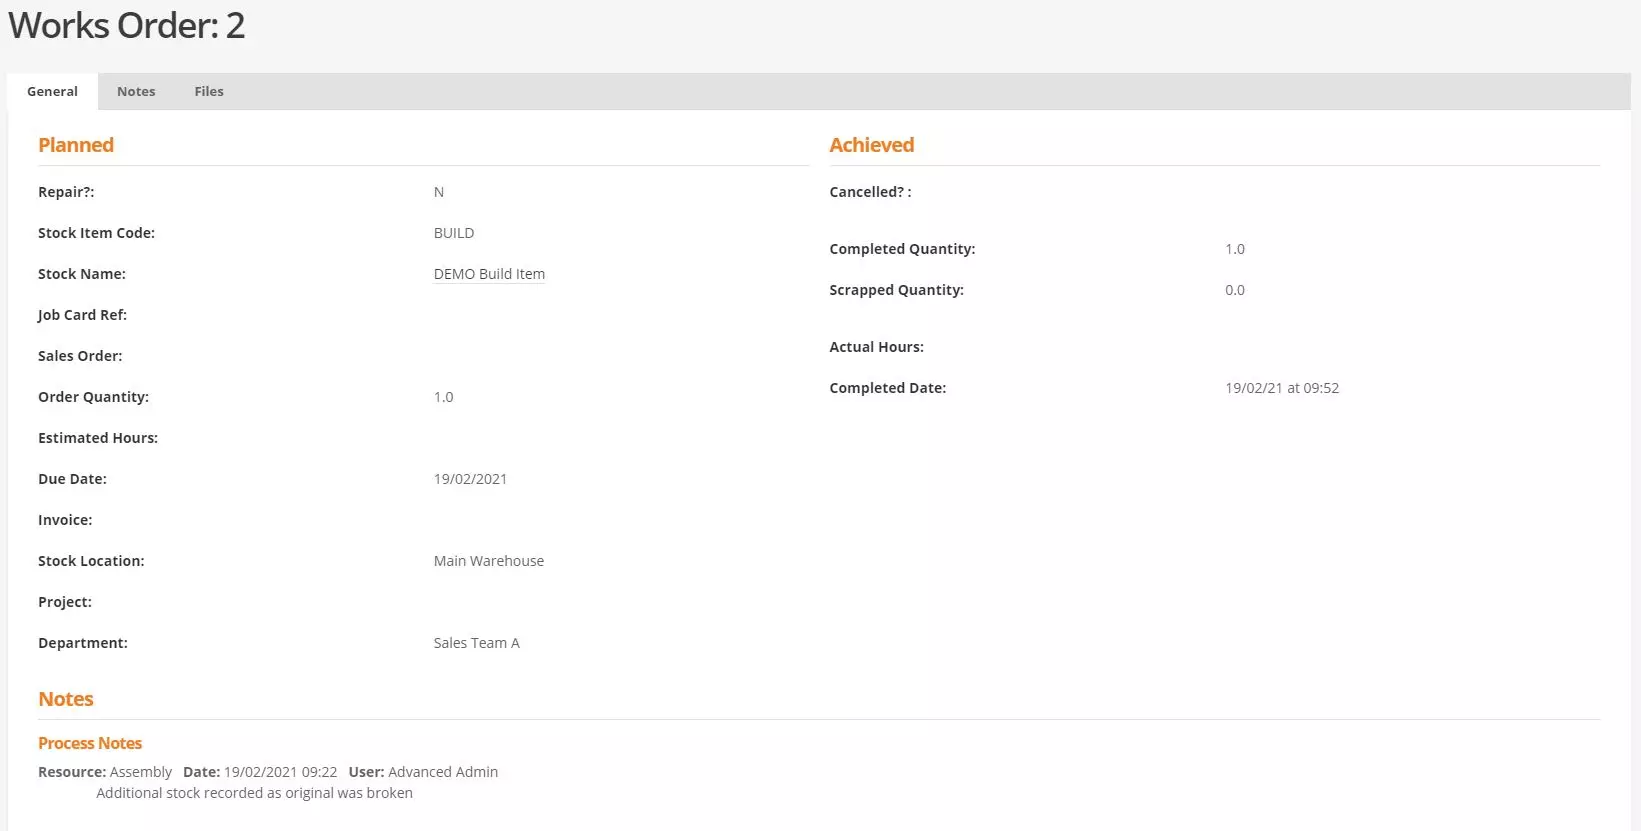
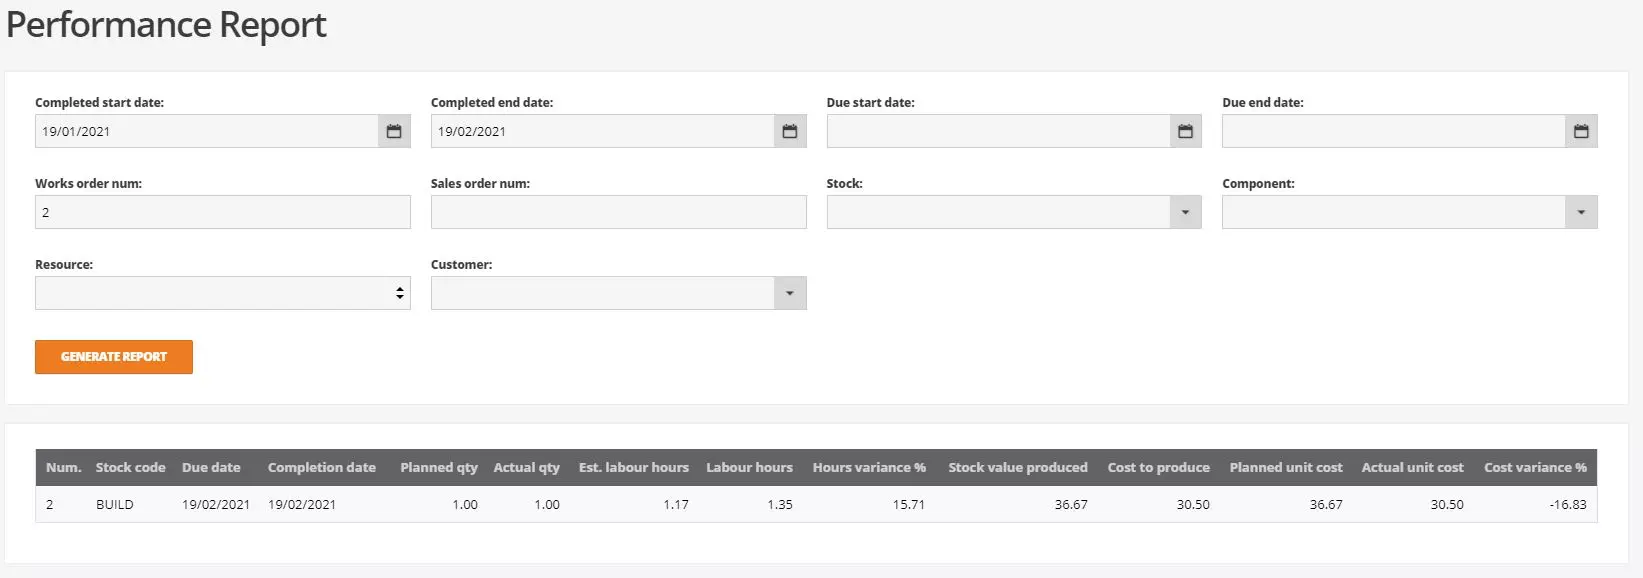
Once resources have been created, they can be attached to manufactured stock items as part of the bill of material or added ad hoc against the works order, actual time can then be recorded and reports for production costing can be seen that look at the actual time spent and cost per hour to give pretty accurate costings for production.

Manufactured Stock Items

If an item is being manufactured and requires a works order to be created, then the ‘manufactured?’ option MUST be enabled against the stock item record.

For items with the ‘Manufactured?’ option enabled an additional tab will display within the item record called manufacturing. Within the manufacturing tab users can record the standard batch Qty, components and processes routings for the build item, otherwise known as the bill of materials.


Manufacturing Screenshot


The components and Qty recorded relate to each single UOM however the processes routings and timing relate to the batch qty of the build. When a works order is created for the item for a higher or power qty the system will automatically calculate the new component Qty’s and process timings. Additional components, Qty’s, process routings and time can be recorded against the works order ad hoc, as well as removing them. If changes are made on a works order it will be traceable through the works order ID however will not update the bill of materials unless the stock record is amended.

Costing for manufactured items is slightly different to standard stock items whereby they have a ‘material cost’ recorded under the supplier’s tab but for manufactured items this is split out into material cost, subcontracted cost and labour cost. The system can populate these automatically looking at the component material cost and resources cost per hour against Qty’s and time required or the user can manually populate the different cost. To allow the system to calculate this the ‘use calculated cost’ MUST be enabled.


Manufacturing Screenshot


  • Batch Qty relates to the standard Qty you make. This is useful to set if you have a minimum build Qty. The batch Qty is also used for the process routings timing. Time recorded is for the total batch and if an order is created for a different Qty then the system will automatically adjust the time.
  • Consolidate multiple works order into one order mean when there is multiple different demand for the item the materials requirement planning report will suggest to create just one works order instead of individual works orders for each demand.
  • To record the process routing, under the manufacturing tab or even on a works order ad hoc the resources MUST be set up in the system.
Tips-Image

Remove or Replace Items within a bill of material

If an item is no longer used, then it cannot be deleted from the system however, you can mark the item as obsolete which will remove it from your stock & Items list.

IMPORTANT: make sure to remove any stock Qty’s before making item obsolete.

To remove the item, navigate to the stock and order items screen, select the check box against the item in question and select actions at the top of the screen followed by obsolete item. This will load obsolete item screen where you can choose to supersede (replace) the items on open order or if left blank leave the item on the open orders but mark it as obsolete so no further orders can be created.


Manufacturing Screenshot


‘continue to where used’ if enabled when selecting obsolete you will be taken to the component usage report which will display a list of all manufactured items that contain the item as part of its BOM. From here users can select the manufactured items and choose to replace the component with something else or simply remove it from the BOM


Manufacturing Screenshot


  1. When replacing item within a BOM the original materials QTY will be used. If you require a different QTY for the new item, you will need to do this manually from the main manufactured stock record under the manufacturing tab.
  2. When replacing item under the BOM the item will be replaced but the same QTY will be used.
  3. Re activate obsolete items, filter from stock & items for ‘obsolete’ stock and edit the record in question, un tick ‘obsolete’
Tips-Image

Works Order Screen

Navigate to operations > works orders
For all items marked as manufactured in business cloud a works order will need to be created and completed so stock of the build item can be adjusted in and components adjusted out. All works orders and repair orders created will display on the works order screen under operations. Users can filter the screen using the advanced search filters, so they are only looking at records relevant to them.

From the works order screen users get an overview of open works orders and can complete multiple tasks including creating works orders and repairs, updating existing works orders and repairs, completing works orders and repairs, as well as printing job cards and running production reports.


Manufacturing Screenshot


Creating works orders manually

Works orders can be created automatically from the sales order screen, through materials requirement planning or manually from the works order screen. The below example shows creating a works order manually. Although there are other ways of creating works orders the details within the are the same.

To create a works order manually, navigate to the works order screen and select +new at the top of the screen. The works order form will load for users to populate. This is split into 3 main sections, order details, components, and processes. Search for the build item by the stock code or name, set the due date for the order and confirm the required. If default projects and departments have been set up against the build item, these will be prepopulated however can be amended if required. Once completed select the ‘RESET COMPONENTS AND ROUTINGS’ option as this will update the component Qty’s and resource time where a BOM is being used.


Manufacturing Screenshot


Once the build items have been select, the components and processes will be populated provided a BOM has been recorded against the item. If there is no BOM then components and processes can be added at the point of creation. If components and processes for the build are unknown, they can be recorded later editing the works order or from the live process view.

IMPORTANT: If the build item and / or components have been marked as ‘use serial number then the build and component serial number can be recorded at the point of creating the works order or again populated later.


Manufacturing Screenshot


There is a notes section against all works order that allows users to record notes for the production, notes will display on the job card documentation as standard. If the item on the works order has any note recorded against the bill of material these will pull through. If the works order is created from the sales order screen, any notes from the sales order will also display within the works order note section.


Manufacturing Screenshot


  1. It works orders are created for items that have several components and subassemblies then the subassembly works orders will need to be created either mainly or through MRP
  2. ‘Reset component and routing for QTY’ this MUST be selected is you amend the QTY field.
  3. Plan start time will give a scheduled start date and time for the resource and will influence the scheduling and live proves view screen
  4. ‘Add to schedule’ will look at the resources planned start date and time and add this to the scheduling screen.

Print Job Card
A job card can be printed which will detail all components required along with any process routing and time required. Navigate to Operations > Works Order > Actions against the works order > Print job card

Tips-Image

Materials Requirement Planning (MRP)

When looking at the materials requirement planning screen it is split into two areas, requirements and planned for creation. The requirements section displays items that are out of stock or below their MAX qty’s within a filtered period allowing users to plan works order production and purchasing effectively. The planned for creation section looks at the data within the requirements screen and will suggest what works order and / or purchase orders need to be created to bring stock levels to where they need to be to meet demands.

Requirements: First users will need to apply filters to the update and present the requirements. Up to a set date and influence how the table is displayed and what due sales / works orders are included. Once populated the results can be sorted by under max Qty or stock name in ascending or descending order. By default the results will pull through both manufactured and none manufactured items however this can be set under the show field. ‘Bring to top Stock:’ allows users to enter a stock name to pull to the top of the results table. If an item is manufactured all its components will pull to the top under it as shown in the below screen shot.


Manufacturing Screenshot


Required Items will show the stock name or code with the max and in stock qty under it in the first column followed by a breakdown of dates depending on the filters and view selected when running the requirements. Within each period users can see the demand (+/-) and current/expected qtys (stock) as per the demand. To see where demand is coming from users can click into the cell below the date against the item and at the top of the screen the demand and id will show. WO(works order) SO(sales order) or PO(purchase order) SP (Sales Prediction)


Manufacturing Screenshot


While a cell is highlighted, a works order or purchase order can be planned for creation by selecting the ‘Add Order’ button located in the top right corner of the Requirements report. The system will automatically display a new works order or purchase order form depending on the item you are working with. Confirm the due date, location and Qty and select OK. This will then update the requirements screen to show new predicted Qty’s. Planned orders will display under the planned for creation section found at the bottom of the screen where users can then select to create the orders.


Manufacturing Screenshot


As well as adding planned orders as detailed above, users can run the planned for creation report which will look at all requirements up to a specific date and suggest which items need a WO (works order) or PO (purchase order). Users can then select the check box against all orders they want to create followed by the ‘add to planned’ option. Again once added to the plan these will show at the bottom of the screen under the planned for creation section for users to then select create, creating all works order and / or purchase orders.


Manufacturing Screenshot


  1. A checkbox to include Sales forecasts
  2. Any changes made to the filters needs to be submitted by pressing the UPDATE button
  3. It is only possible to use this feature if stock items have preferred supplier details set up against them. These orders will not be sent to suppliers and will still require confirmation in the Suppliers screen. See the Send Purchase Orders section details further below in this guide
  4. RED WARNING ICON: This will show if the system has found a potential issue for ordering the stock item. Hover over the icon to see the reason.
  5. IMPORTANT: Once you create the purchase and or works orders the system will take you to the operations overview screen. You will need to go to the purchase orders screen to print/email the purchase order to your supplier.
Tips-Image

Scheduling

The scheduling screen in business cloud provides an interactive, drag and drop interface for works order planning. The scheduling screen is split into 2 sections. First is a list of all open works orders that have not yet been scheduled. By default, the table will display in works order ID order however can be sorted by Qty or due date by selecting the column header. Second is the list of resources, dates, and capacity (shaded grey box). The default start date and capacity shown on screen is pulled from the resource record however can be amended by dragging and dropping then capacity box.


Manufacturing Screenshot


To add works orders to the scheduled simply select ‘+ADD’ next to the order. The system will take the works order and place it into the scheduled at the earliest availability. Multiple works orders can be added to the schedule and again these will be added to the next available time for the resources. Each works order will display as its own colour for users to clearly see individual works orders. The time reserve for the resources is taken from the time recorded against the resource line within the works order.


Manufacturing Screenshot


Although works orders are added and by default cannot overlap, business cloud is flexible and allows users to drag and drop works orders on the scheduling screen. If works orders cross over (use the same resource at the same time) the system will not stop it, however it will display red lines through the colour block as an indication it is overlapping.


Manufacturing Screenshot


Each resource can have up to 3 blocks of time against it. This relates to the set-up, process and cool down time recorded against the recourse line on the works order.


Manufacturing Screenshot


With business cloud being flexible for scheduling, if for example a machine is taken offline for maintenance however another machine could be used. Then the resource can easily be switch from the scheduled screen by right clicking the coloured block against the works order in question then select change resource.


Manufacturing Screenshot


Whenever anything has been added or updated on the scheduling screen, it MUST be saved else all changes will be lost.

  1. Works order can be removed from the scheduled, selecting the works order and then selecting ‘remove from schedule’ at the top of the screen
  2. Work order details can be seen when clicking onto the works order top across the top of the screen. This will show WOID (works order), due date, start time, duration and finish time.
  3. You can slide the colour boxes forward and backwards to amend the start times of the process
  4. You can also extend the availability period of a resource by sliding the grey box forward/backward or selecting the small darker grey square in the bottom right corner to make it available longer or shorter.
Tips-Image

Live Process View

The live process view screen provides a dynamic view of your production status. To record actual time against resources for production to report on later, users MUST work from the live process view screen.

All works orders created with resources recorded against them will display on the live process view pending completion. Users can filter the screen to view only works order or resources they want. A user cannot edit a resource or mark it as complete until the one before it has been complete. The order in which resources are completed depends on the order they display against the works order record.


Manufacturing Screenshot


Select edit to open the process screen where users can record components, qty’s, serial numbers, time used along with any notes relating to the resource. If a works order has a bill of material recorded, then the list of components and qty to use will display for users to confirm. Additional components and qty’s can be recorded selecting +NEW COMPONENT ITEM.


Manufacturing Screenshot


Actual time for the process can only be recorded If the system setting ‘enable works order process start time’ is enable, then the hours spent section will display where users can record time used against each process. If this is not enabled the default time recorded against the resource line on the works order will be used.


Manufacturing Screenshot


Before completing the process, users can record notes against it, this is particularly handy if additional QTYs have been used. These notes will be attached to the works order record and will have the users name assigned to them.


Manufacturing Screenshot


Once completed the next process can be started and completed, as processes are completed the status column on the works order screen will be updated and once all have been completed the works order can be completed.

  1. Last completed will display all previous resources that have been marked as completed.
  2. Once resources have been completed, they cannot be reversed or edited
  3. Repair orders WILL NOT show on the live process view screen and must be completed from the works order screen
Tips-Image

Complete Works Orders

Once all processes have been completed on the live process screen the works order can be completed. Only at the point of completing the works order will stock adjustments be made. To complete a works order select actions against the works order on the works order screen.

From the complete works order screen users MUST confirm the details for the completed build such as completed Qty’s, scrap qty’s, stock location and batch or serial numbers to be assigned. As well confirming the build item details, users will be able to view the components, qty’s and serial numbers. The calculated Qty relates to the original works order Qty and the recorded Qty relates to the Qty recorded on the live process view screen allow users to populate the qty field with the correct qty, making amendments if required.


Manufacturing Screenshot


Before completing the order there is a notes section which will populate with all previously recorded notes against the works order but can also be added to if required. Once a works order has been completed it will no longer show on the works order screen unless users filter to view completed orders.

IMPORTANT: process notes cannot be seen on the works order complete screen however if users open the works order record by selecting the works order ID on the works order screen this will display all details recorded including the process time, user and notes.


Manufacturing Screenshot


Works order performance report

To report on a works order performance select reports from the works order screen and run the performance report. Filter the report by completed date, due dates, works order number, sales order number, stock item, component items, resources and / or customer. Once filter the results will show in a table report on screen. This will give a breakdown of planned cost for the production against actual cost for the production allow users to see any variances much quicker, allowing them to make better business decisions where losses may occur.


Manufacturing Screenshot


Record Quality Assurance

Navigate to operations > quality assurance
The quality assurance screen will display all non-conformance entries, open and closed within the table. To record new entries select ‘+new entry’ at the top of the QA screen, this will then load the non-conformance entry screen for users to populate. Not all fields are required however the more detail recorded the more users will get back from the system when it comes to reporting.


Manufacturing Screenshot


Users can create credit notes from the non-conformance entry if required, select actions against the record followed by raise credit. Users can then select the invoice to be credited. For more information, please contact your project manager.

NOTE: Scrap Quantity is a record only field and will not affect stock qty.


Ready for the next chapter? Head on to Chapter 7: Warehouse Operations or view all chapters.

Not Already An Advanced Business Cloud Essentials User?

If you’re struggling with the challenges of running a manufacturing business and looking for solutions then Advanced Business Cloud Essential could be the answer and we even offer a free review of your business’ processes to understand which software system could help you.

Our advice and guidance is always free and we’re happy to talk to any business, no matter what stage of the thought process their going through. We have built our business on the values of trustworthiness and passion and will happily provide assistance to you, so if you want a chat, just get in touch.

Request A Free Review >
mrp and manufacturing software
Contact 0808 253 0490 info@thehbpgroup.co.uk
Loading…